Bootloader troubles
21 posts
• Page 2 of 3 • 1, 2, 3
Re: Bootloader troubles
![]() by BenedictTaylor » Mon Sep 29, 2014 3:27 pm
by BenedictTaylor » Mon Sep 29, 2014 3:27 pm
Thanks Rodot I just tried that method and found that the name remained the same after power was removed
- BenedictTaylor
- Posts: 12
- Joined: Sat Sep 27, 2014 1:25 pm
Re: Bootloader troubles
![]() by BenedictTaylor » Mon Sep 29, 2014 4:02 pm
by BenedictTaylor » Mon Sep 29, 2014 4:02 pm
I also tried using the sd card with the normal SD library but the serial port just read out initialization failed
- BenedictTaylor
- Posts: 12
- Joined: Sat Sep 27, 2014 1:25 pm
Re: Bootloader troubles
![]() by jonnection » Mon Sep 29, 2014 6:43 pm
by jonnection » Mon Sep 29, 2014 6:43 pm
By the way, Benedict:
I had an old 32 or was it 64 mb sd card from an old mobile phone. I tried to get it to work but couldn't. When I compared it to a modern 2GB card, I noticed that the contact pads on the other side are slightly different in modern high capacity cards. I couldn't get the old card to work at all in my SD-card breakout. I am now using a 2GB card and it works fine.
So it might be that your sd-card breakout is not reading your very old sd card properly.
-

jonnection - Posts: 317
- Joined: Sun May 04, 2014 8:21 pm
Re: Bootloader troubles
![]() by BenedictTaylor » Mon Sep 29, 2014 8:54 pm
by BenedictTaylor » Mon Sep 29, 2014 8:54 pm
That could possibly be it as I have just tested a full size SD card with another reader module and it worked fine. I would use this for now, but would this 16GB FAT16 SD card work?
- BenedictTaylor
- Posts: 12
- Joined: Sat Sep 27, 2014 1:25 pm
Re: Bootloader troubles
![]() by BenedictTaylor » Mon Sep 29, 2014 8:59 pm
by BenedictTaylor » Mon Sep 29, 2014 8:59 pm
And also could you tell me which pins I need to be hooking the sd reader up to my arduino nano. I would also like to point out that in the video about the new bootloader, when an SD card was not present it told you, and didn't just take you back to the home screen like mine does (I don't know if this is relevant but thought it might add some extra information)
- BenedictTaylor
- Posts: 12
- Joined: Sat Sep 27, 2014 1:25 pm
Re: Bootloader troubles
![]() by rodot » Tue Sep 30, 2014 5:06 am
by rodot » Tue Sep 30, 2014 5:06 am
Your micro SD card has to be 2GB or less and formatted in FAT in order to be compatible with the bootloader.
When you upload the program "loader" via USB, does it correctly displays the list of the HEX files?
For the pinout, it's in the schematics, on the hardware page.
You might need this to find which pin correspond to which "arduino" pin:
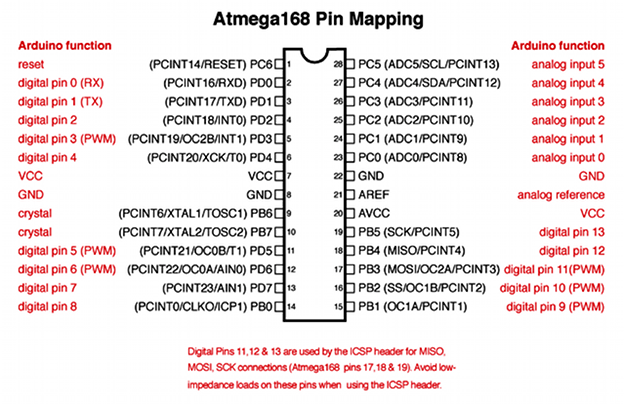
When you upload the program "loader" via USB, does it correctly displays the list of the HEX files?
For the pinout, it's in the schematics, on the hardware page.
You might need this to find which pin correspond to which "arduino" pin:
-

rodot - Site Admin
- Posts: 1290
- Joined: Mon Nov 19, 2012 11:54 pm
- Location: France
Re: Bootloader troubles
![]() by BenedictTaylor » Tue Sep 30, 2014 2:31 pm
by BenedictTaylor » Tue Sep 30, 2014 2:31 pm
I have just tried this out and the screen just gets stuck on the "reading SD card" screen
- BenedictTaylor
- Posts: 12
- Joined: Sat Sep 27, 2014 1:25 pm
Re: Bootloader troubles
![]() by jonnection » Wed Oct 01, 2014 9:57 am
by jonnection » Wed Oct 01, 2014 9:57 am
Benedict,
problems with the SD card are hideously difficult to debug. You have to be systematic in your search for the problem or then you have to have a logic analyzer to decode the SPI communication between the microcontroller and the SD card.
1) triplecheck the pinout. Compare your pinout with the picture Rodot gave and gamebuino schematic. MOSI and MISO are "fixed" pins, ie. it is likely you have them wired correctly if you have followed any kind of pinout. But the CS (cable select) is very very very important, because it tells each SPI device that it is active or not. And CS pin can be different between Arduino libraries and Gamebuino. It is usually defined in the beginning of the program.
2) use a 2GB card formatted to FAT16
3) try the SD card example programs in the Arduino IDE. They WILL tell you via serial communication where the reading process fails. If the reading fails already in the so-called initialization of the card, there is no chance that you will get it to load games or anything. Again, check the CS pin setting when you compile the program. Wrong CS pin = no card initialization.
4) When you get point 3 working, then and only then there is point in trying to get the Gamebuino loader / bootloader to work. If you can't read the card, there is no way that the Gamebuino bootloader is going to be able to read the HEX files from the card. It will just get stuck in "Reading the card" or something.
5) If all else fails, try the experimental bootloader in the github beta branch that I have made. It is slower and works with more different cards.
-
jonnection - Posts: 317
- Joined: Sun May 04, 2014 8:21 pm
Re: Bootloader troubles
![]() by rodot » Wed Oct 01, 2014 12:29 pm
by rodot » Wed Oct 01, 2014 12:29 pm
Thanks Jonnection  I merged your bootloader to the main branch in the last update, so he's already using the last version
-
rodot - Site Admin
- Posts: 1290
- Joined: Mon Nov 19, 2012 11:54 pm
- Location: France
Re: Bootloader troubles
![]() by BenedictTaylor » Sat Oct 25, 2014 8:01 pm
by BenedictTaylor » Sat Oct 25, 2014 8:01 pm
Thank you both for helping me, and I apologise for the (very) late reply, but it still doesn't work for me. I've just re-breadboarded the circuit in a much neater way, and thought that I should clear some things up.
When I first made up the screen circuit, I had to play around with the wiring until it worked. However, on reflection when attempting to use the schematic this time around, I found that the screen would not work, so I was forced to copy it from what I had already done. I would like your opinion as to whether it would cause any undesired effect on my device, even though everything seems to be working fine (except, of course, the bootloader).
I would also appreciate if you (Jonnection) could tell me what happened with your old micro sd card (i.e. what happened when you held down the 'C' button) since, unlike the demo that Rodot uploaded to youtube, when I hold the 'C' button down the whole system just restarts.
Thanks for your continued support,
Ben
- BenedictTaylor
- Posts: 12
- Joined: Sat Sep 27, 2014 1:25 pm
21 posts
• Page 2 of 3 • 1, 2, 3
Return to Installation & Troubleshooting
Who is online
Users browsing this forum: No registered users and 2 guests