
Archive of the Gamebuino Classic wiki, recovered from the Wayback Machine (capture 2017-10-28). Read-only.
Getting started
Contents
Get a Gamebuino
To order a Gamebuino along with some cool customization accessories, head to the Gamebuino Shop.
While you wait for your Gamebuino to arrive, you can start to play and program games using one of the Emulators.
Use your Gamebuino
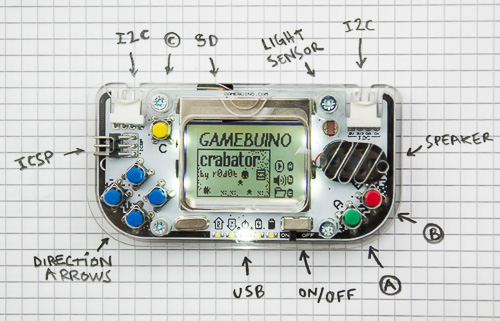
Turn it on
You just received your Gamebuino. Hurray! You should first turn it on to check that nothing has been damaged during shipping. If nothing shows up the battery may be empty or the screen may have moved... don't panic, and head to the troubleshooting page.
Load games from the micro SD card
- The new graphical loader allows you to navigate through games easily. You can select a game, see it's description (use up and down arrows to browse through the description), delete saved games, or delete the game itself.
- To get back to the loader from a game, press "C" when in the game's main menu.
- For it to work, the micro SD card needs to be inserted, to be formatted to FAT, and to contain at least the file LOADER.HEX. See Troubleshooting#SD_card
- Pro Tip: If you accidentally turn the Gamebuino off while a game is loading, it won't start again. To solve this: hold "C" down, turn the Gamebuino ON, release "C", and wait 30 seconds for LOADER.HEX to be loaded from the SD card. You can also use this if you are stuck in a game which doesn't allow you to get back to the loader.
Adjust settings
- When in the loader, select SETTINGS:
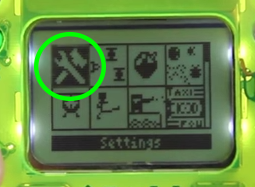
- Useful settings:
- Default username in "change settings/player name"
- Display contrast in "change settings/display/contrast"
- Disable the critical battery alert by setting it to 0 in "change settings/battery/critic voltage"
- Mute sound by default by setting "sound/default volume" to 0.
- Don't forget to select "save" before you exit!
Charge the battery
Simply plug in a micro USB cable (or smartphone charger). A full charge will give you up to 24 hours of play time... enough to beat your Tetris highscore!
Pro Tip: Charge your Gamebuino from time to time, or the battery will die over a few months.
Software setup
Install Arduino
- Download and install Arduino from here.
- Arduino 1.0.5 or above required. Arduino 1.6.2 or above recommended, it will make the library installation easier.
Install the Gamebuino Library (Automatic)
For Arduino version 1.6.2 and newer.
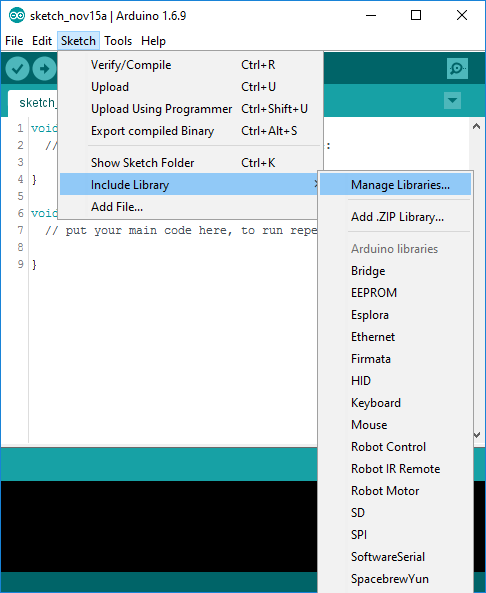
Open the library manager:
Type "Gamebuino" in the search field, select the Gamebuino library and click "install":
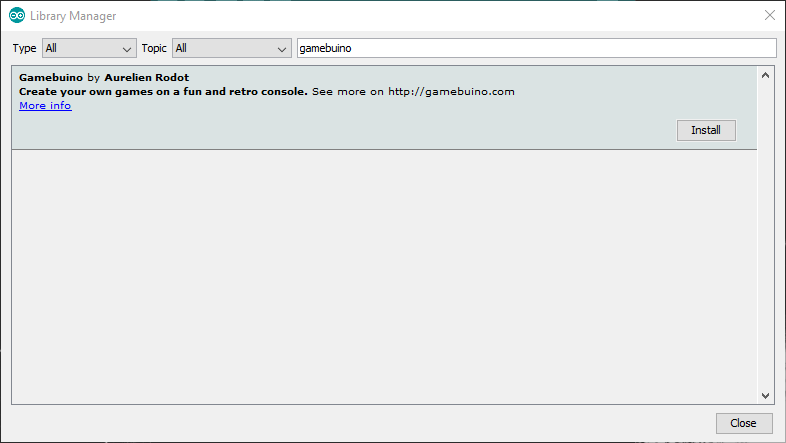
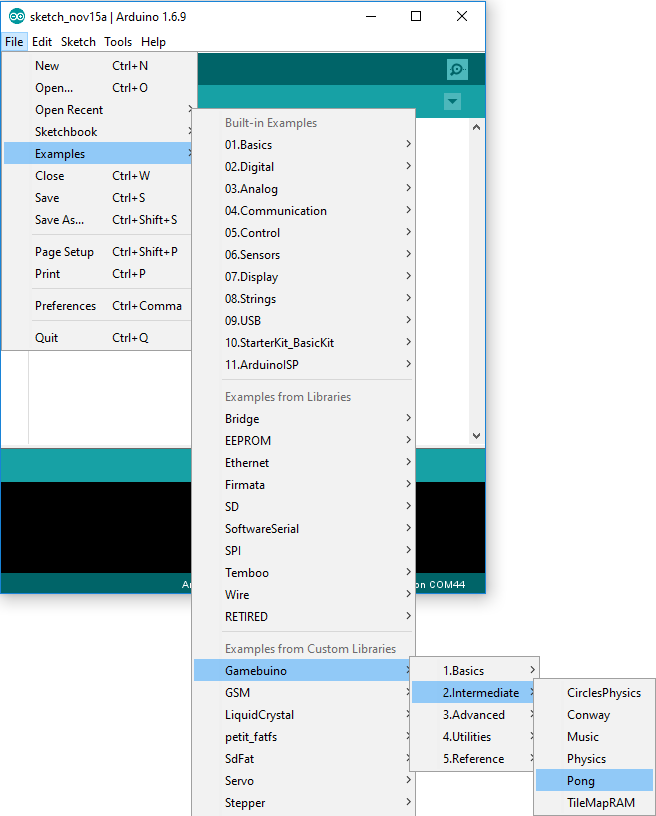
Now restart Arduino, and the Gamebuino examples will show up. Give it a look!
Install the Gamebuino Library (Manual)
For Arduino version pre-1.6.2.
- Download and the Gamebuino library here [download zip] and extract it (see download page for more).
- Put all the files in <sketchbook>/library/Gamebuino/
- Windows: Documents/Arduino/library/Gamebuino/
- OS X and Linux: <home>/scketchbook/library/Gamebuino/
- You can change the sketchbook location in Arduino preferences: File/Preferences/Sketchbook location (requires a restart).
- Restart Arduino and click on File/Examples/Gamebuino. If Gamebuino is not there, check that the library is in the right location and restart Arduino.
Install the Gamebuino board
COMING SOON: Arduino board manager compatibiliy.
Select the board
For a quick start, select Tools/Board/Arduino Uno, then select Tools/Processor/ATmega328.
Install the drivers
If you need help installing the drivers, refer to the Arduino guide (Windows, MacOSX, Linux). Note that your Gamebuino should be turned on when you connect it to the computer
Upload a game through USB
- Start Arduino
- Open an example: File/Examples/Gamebuino/
- Select the right device: Tools/boards/ (you can either choose Gamebuino or Arduino Uno).
- Select the serial port: Tools/Serial Port/
- If it's grayed out check the drivers, your USB cable, and that the Gamebuino is ON.
- Click on "Upload"
- Pro Tip: press Ctrl+U instead
You just uploaded your first Gamebuino game, congratulations !
Pro Tip: You can use one of the Emulators during development, rather than using the USB upload, this will allow faster development. Once you're done put the HEX file on the SD card (see below) and play your game for real on your Gamebuino!
Put games on the micro SD card
Get an .HEX
You need a compiled game in the .HEX format on the micro SD card to be able to play them on your console. .HEX can also be played on a computer using the Simbuino emulator (see Download).
You can get a compilation of the necessary .HEX files (LOADER.HEX and SETTINGS.HEX) along with up-to-date games here: Gamebuino-Games-Compilation [download zip].
Browse all the games created by the community by visiting the Games Gallery.
Make your own .HEX
- Start the Arduino software
- Click on File/Preferences and check "Show verbose output during compilation"
- Compile your program (Ctrl+R)
- A lot of text will scroll in the black area at the bottom of the window. The build directory path will be displayed there, and should looke something like:
- Windows:
"C:\Users\Username\AppData\Local\Temp\build[random number].tmp\a_Hello.cpp.hex". - GNU/Linux:
"/tmp/build[random number].tmp/a_Hello.cpp.hex" - Mac : Type
open $TMPDIRin your mac's terminal to open the folder that is otherwise not accessible. You can then make a shortcut to your desktop.
- Windows:
- You can also change the build path in
"arduino/lib/preferences.txt"by changing the line#build.path=tobuild.path=(directory you want). - Navigate to this folder and find the .hex file with the name of your program
- Rename it to a 8:3 format: only capitals, 8 characters max for the name and .HEX extension. For example: CRABATOR.HEX or PONG.HEX
Put it on the micro SD card
Put your .HEX file with a 8:3 name on your micro SD card using any micro SD card reader. You can now select the .HEX file on your Gamebuino to load it on the go, without a computer! Do NOT turn off your Gamebuino while flashing.
Add a logo and description
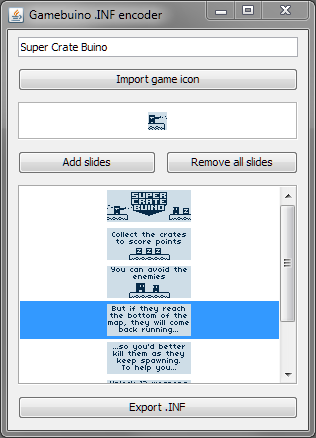
If you want your game to appear with a logo and description in the loader, you have to create an .INF file and put it along the .HEX file on the SD card.
- Get the INF encoder from the Download page (requires Java).
- Put the generated .INF file along with the game's .HEX file on the SD card. They must have the same name, all in capitals, and 8 characters max. For example CRABATOR.HEX (the game binaries) and CRABATOR.INF (the description file).
- Logo must be 19*18px
- Slides must be 84*32px, up to 255 slides is allowed.
- Drag and drop slides to reorganize them
- The first slide is the one shown while the game is loading
- Slides can be used to describe the game, tell the story, explain how to play, etc. By putting this information in the INF you can read it before loading the game, everything that's in the .INF don't need to be in the .HEX so it frees some space for your code.