
Archive of the Gamebuino Classic forum (2014-2018), rebuilt from the pages kept by the Wayback Machine: only part of the topics and pages were captured. Read-only. Removal on request: hi@gamebuino.com.
Gamebuino Advanced prototype has been built
Duhjoker Mon Mar 20, 2017 9:14 am
Here is the source code............
https://github.com/Duhjoker/GameRIot_ESP
https://github.com/Duhjoker/GameRIot-master_gaming
I update libraries consistently.
Ive been away for a lil bit and decided to work on finishing my hardware prototype. The code is fine but skills need work and some reviewing.
I went through a few different designs fir the case. I started with a flodibg case but was a nightmare so i decided on a hex shape. The shoulders are at the top chamfers. I also used some advanced techniques found in professional plastic toys and game controllers. So what i did was recessed all the buttons where they were flush with the case on the inside. I did the same with the screen but not flush. This was excellent in controlling the profile thickness as i was able to also insulate and glue the battery directly to the screen.
Theres plenty of room for more processor too. Whether it be a teensy 3.2 to a 3.6 layed side ways in the case as seen in the. Im having some trouble right now getting the screen working again but i will post more pics and a video soon
im actually thinking of going ESP which will also fit nice and with 4mbits flash and 16more can be adeed it should alleviate the need for an sd card for now. Plus its faster and has wifi and blue tooth. IOT baby. I hear theres away to add emulators for NES so thats a plus and gives extra playabilty.
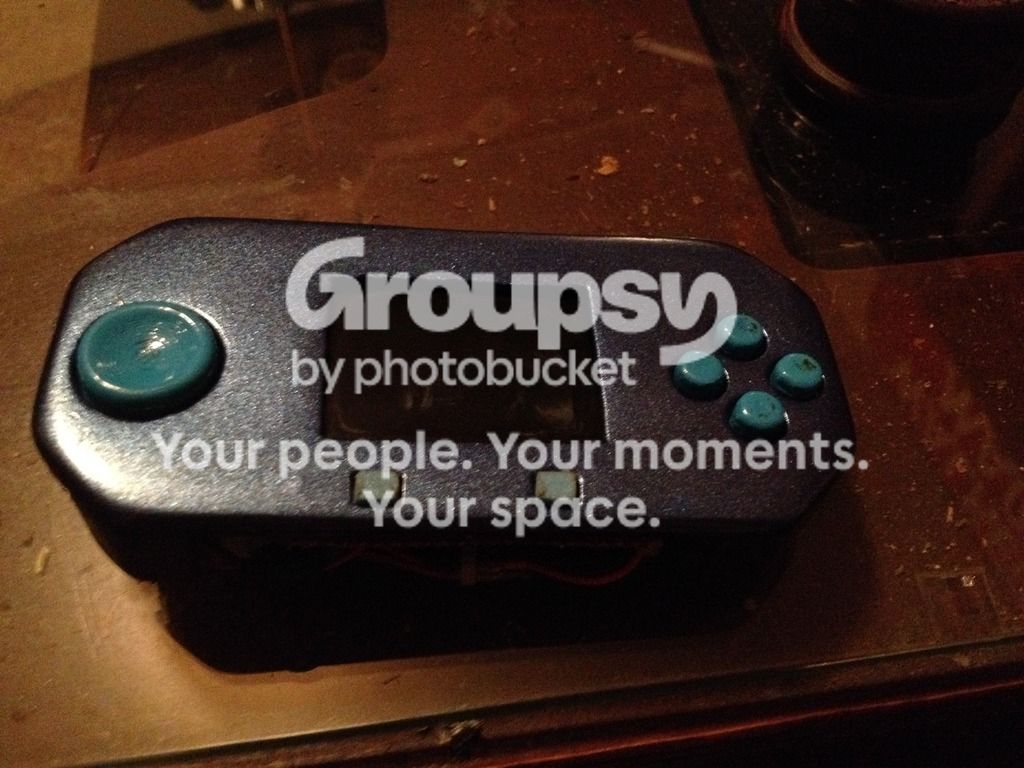
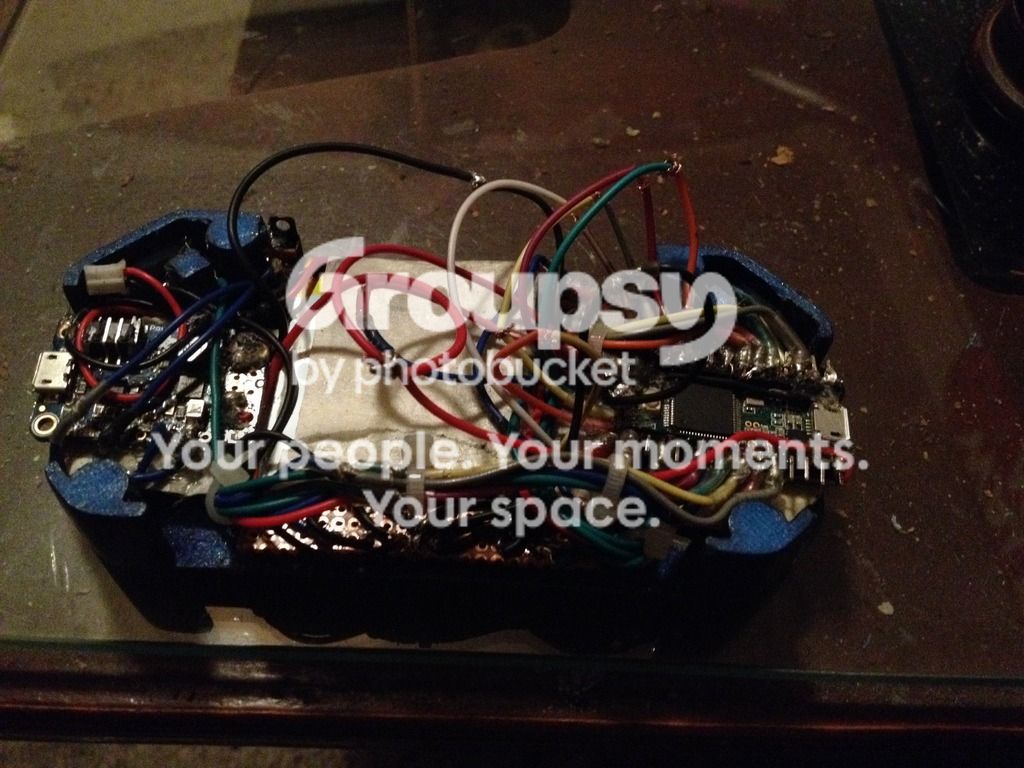
All it needs now though is a back. And some artistic wiring. If any body wants a case to make thier own, i can print it for you.
https://github.com/Duhjoker/GameRIot_ESP
https://github.com/Duhjoker/GameRIot-master_gaming
I update libraries consistently.
Ive been away for a lil bit and decided to work on finishing my hardware prototype. The code is fine but skills need work and some reviewing.
I went through a few different designs fir the case. I started with a flodibg case but was a nightmare so i decided on a hex shape. The shoulders are at the top chamfers. I also used some advanced techniques found in professional plastic toys and game controllers. So what i did was recessed all the buttons where they were flush with the case on the inside. I did the same with the screen but not flush. This was excellent in controlling the profile thickness as i was able to also insulate and glue the battery directly to the screen.
Theres plenty of room for more processor too. Whether it be a teensy 3.2 to a 3.6 layed side ways in the case as seen in the. Im having some trouble right now getting the screen working again but i will post more pics and a video soon
im actually thinking of going ESP which will also fit nice and with 4mbits flash and 16more can be adeed it should alleviate the need for an sd card for now. Plus its faster and has wifi and blue tooth. IOT baby. I hear theres away to add emulators for NES so thats a plus and gives extra playabilty.


All it needs now though is a back. And some artistic wiring. If any body wants a case to make thier own, i can print it for you.
awesome101 Tue Apr 11, 2017 1:51 am
Hey there Duhjoker! :D
I have wanted to build something similar for a while now, but I wasn't sure if the gaming experience would be smooth (maximum SPI speed on Arduino on ST7735 allows for only around 10 - 20 frames per second updates). Does the library work fast in enough for games? Please keep me updated as I want to build this.
Thanks in advance,
Awesome101
I have wanted to build something similar for a while now, but I wasn't sure if the gaming experience would be smooth (maximum SPI speed on Arduino on ST7735 allows for only around 10 - 20 frames per second updates). Does the library work fast in enough for games? Please keep me updated as I want to build this.
Thanks in advance,
Awesome101
awesome101 Tue Apr 11, 2017 2:11 am
I could possibly use an external I2C SRAM module that stores a tile buffer or something. I could also use the parallel interface, but so far nobody has written a library uses the 8-bit parallel interface. The Atmega328P only has 6 pins on PORTB anyway so I would have to use another two pins from PORTD. The main reason I don't want to use a Teensy is because it is difficult to write a bootloader that can load hex files off of the SD card. To achieve something like 50 FPS @ 160x128 on Atmega328P,however, would require me around 7 cycles to load a byte from memory and write the byte to the display on SPI, which is extremely difficult. And that is without any game logic or other processing.
Duhjoker Tue Apr 11, 2017 2:37 am
I was gonna do an mcufriend version but all the extra wiring would take up more space and more time. Now the library does not use DMA but Kurts spin library takes care of that and adds a buffer. The difference is pretty awesome.
Of course you dont have to use a teensy there are also ESP boards which are a shy bit bigger but worth the $25. Im actually working on a esp32 version for added iot programming plus the 4mb onboard progmem is awesome. And dont forget about the nes emu!!!
A boot loader is much needed though.
Also the library covers your st7735 and most of the 340x220 screens on the market.
Of course you dont have to use a teensy there are also ESP boards which are a shy bit bigger but worth the $25. Im actually working on a esp32 version for added iot programming plus the 4mb onboard progmem is awesome. And dont forget about the nes emu!!!
A boot loader is much needed though.
Also the library covers your st7735 and most of the 340x220 screens on the market.
Duhjoker Tue Apr 11, 2017 2:50 am
Here is the library with a basic setup sketch demo moving the player direction with the dpad and abxy.
Edit: one of the features of the esp32 you might like is that it has two cores. you could have one core doing one thing and the other doing something else.
Edit: one of the features of the esp32 you might like is that it has two cores. you could have one core doing one thing and the other doing something else.
awesome101 Tue Apr 11, 2017 2:55 am
Thanks! I will look into the code. I haven't seen how to run a ST7735 display, so this may take a while to understand for me.
awesome101 Tue Apr 11, 2017 2:58 am
I will probably use a Teensy 3.2. Using an Atmega328P is extremely difficult anyway.
Duhjoker Tue Apr 11, 2017 4:22 am
If you want to use teensy3.2 look at the ili9341 screen on their store and it has the exact pin out. its like 9 total wires.
awesome101 Tue Apr 11, 2017 12:09 pm
Ok I ordered the Teensy
Duhjoker Tue Apr 11, 2017 7:00 pm
What size is the st7735 TFT?
Zvoc47 Tue Apr 11, 2017 9:14 pm
Wow! Awesome! I came back to work on all this stuff. Albertinjo helped me with some equipment and I'm waiting for an Inhaos display (accidentally ordered a 3169 something instead of 7775 XD). He'll solder some headers for the adapter for the flex cable for the XMEGA's external bus interface and I'll be able to connect a display there after I port the graphics library that I have. I tested that old ST7775 display on an Arduino Mega, but it is dead :( Also, the stupid display requires 5V for the backlight while the whole microcontroller must be on 3.3V. WHAT WERE THEY THINKING!? *mimmicks AVGN*. I got my Arduino Mega 5V board running at 3.3v and because of that, I have 3.3V at my 5V pin so I'd have to manually wire everything and then use external 5V to do the thing. I might get my own Arduino Mega from Inhaos which has a 5V/3.3V switch. Maybe that's the board for which this display was made.
Also, I tried buying Teensy 3.6, but the shipping is gigantic! However, I see many ESPs being in use so I might have some use from that. I'm not entirely sure. ESPs are like a few dollars on eBay so I can make easy prototypes. However, the first thing I want to do is revive my XMEGA and make the best of it! LONG LIVE XMEGAS!
Also, I tried buying Teensy 3.6, but the shipping is gigantic! However, I see many ESPs being in use so I might have some use from that. I'm not entirely sure. ESPs are like a few dollars on eBay so I can make easy prototypes. However, the first thing I want to do is revive my XMEGA and make the best of it! LONG LIVE XMEGAS!
Duhjoker Tue Apr 11, 2017 10:54 pm
Glad to see your excited. I'm working on the All in one library now that includes the ESP32. But it only works with the higher resolution screens at 340X220. But the higher res tft's only need 3.3v power so they can be run off the micro-controller itself.
awesome101 Tue Apr 11, 2017 11:27 pm
I haven't bought a display yet. To use the library, what size display would I need?
Duhjoker Tue Apr 11, 2017 11:34 pm
You can use any size but think about your real estate. For using a 2.2inch to 2.4 inch your console case will be 132-140mm wide and the 2.8 being 160 something. I've got a case for the 2.2 screens and templates made for the 2.4 and 2.8.
Just make sure your TFT is not MCU friend and that it does use SPI.
Just make sure your TFT is not MCU friend and that it does use SPI.
awesome101 Tue Apr 11, 2017 11:46 pm
awesome101 Tue Apr 11, 2017 11:59 pm
The display uses ILI9341 and has a resolution of 240x320. Is this the right one?
Duhjoker Wed Apr 12, 2017 1:00 am
Umm i cant find any info for it other than the size. See if they can provide some documentation before you purchade. Alternatively the pjrc store sells the ili9341 in 2.8 for around the same price including shipping. Or check ebay with arduino spi tft.
awesome101 Wed Apr 12, 2017 2:04 am
Ok I looked at the questions section and found the supplier say that it uses ili9341. It uses SPI as well.
Duhjoker Wed Apr 12, 2017 4:52 am
ok then your all set
One thing to mention about the library. I had to make some changes to a few of the core files to get them to work with the teensy. If you run into a problem just let me know and ill send each file.
One thing to mention about the library. I had to make some changes to a few of the core files to get them to work with the teensy. If you run into a problem just let me know and ill send each file.
awesome101 Wed Apr 12, 2017 12:10 pm
Ok
Duhjoker Thu Apr 13, 2017 4:48 am
One more thing to add about the library is to look at the settings.c file for your button pins. You will need to update them to match your set up.
Ok with the chance of being able to procure the smaller 2.2inch screens dwindling daily.... It's come to mind that I need to make some changes to the case designs. The long octoganal shape will end up being 162mm wide with the 2.4inch and about 185mm wide with the 2.8inch. That's as long and longer than a PSVita. Granted I can get the case to under 20mm thick on the profile but it's not really pocket sized.
So I'm looking at different shapes and thought about going back to a folder when I got an idea.....
I love robots especially Hexapods. They just intrigue me. Any way I ran across a thing on thingiverse that's a modular 3D printed snake type robot. Each part has its own power and micro controller. One of the features that made it all work together was neodymium magnets. They not helped attach the snake modules together but they are also connected to the MCU wiring so they can all be used at once or one at a time.
So what I was thinking was maybe I could design a modular system with a core holding the battery the TFT and the screen. Then you could attach extras like d-pad and ABXY buttons on either end or on the bottom. Then other things could be created to attach. This is especially true with the ESP boards. Since any pin can be any pin you could literally build it into any thing for Iot.
I need some ideas. What would guys like to see in a case? What do you think about the sizes I listed?
https://tams.informatik.uni-hamburg.de/ ... clawar.pdf
Ok so I got on my computer and starting playing with 123design and first made a 3D rendered version of the screen. Then I tried a couple things with a one piece but I think it would be better to make a two piece folder. With some clever engineering I can make it 24mm to 26mm total closed and about 13mm open. Or make the bottom and top to connect via magnets and wire then like mentioned above. The battery would be on the back of the screen in the top case with the buttons and your MCU of choice in the bottom case with the buttons.
Edit:::
Ugg I just can't seem to figure out how to do the case but I might have an idea........
I got some dummy parts and started moving stuff around trying to come up with a solution that works and allows the hardware needed and at the smallest possible configuration. So I came up with a square or more like a rectangle barely rectangled.
Have the screen at the top with the dpad and ABXY directly below the screen. Haven't quite figured out the shoulders yet though. The start and select will probably be on the profile or not. For the 2.8 inch we are looking at 95x80x15mm, smaller for the 2.4. Of course.
So to get it so flat I'll imbed the screen into the case along with the button pad circles so the buttons large circle of the button pieces fit flush with the case. Now for sure the battery will have to be attached to he back of the TFT. Then there should be plenty of room to add the MCU behind the button pads to make it as thin as as I can.
Still pocket size at that.
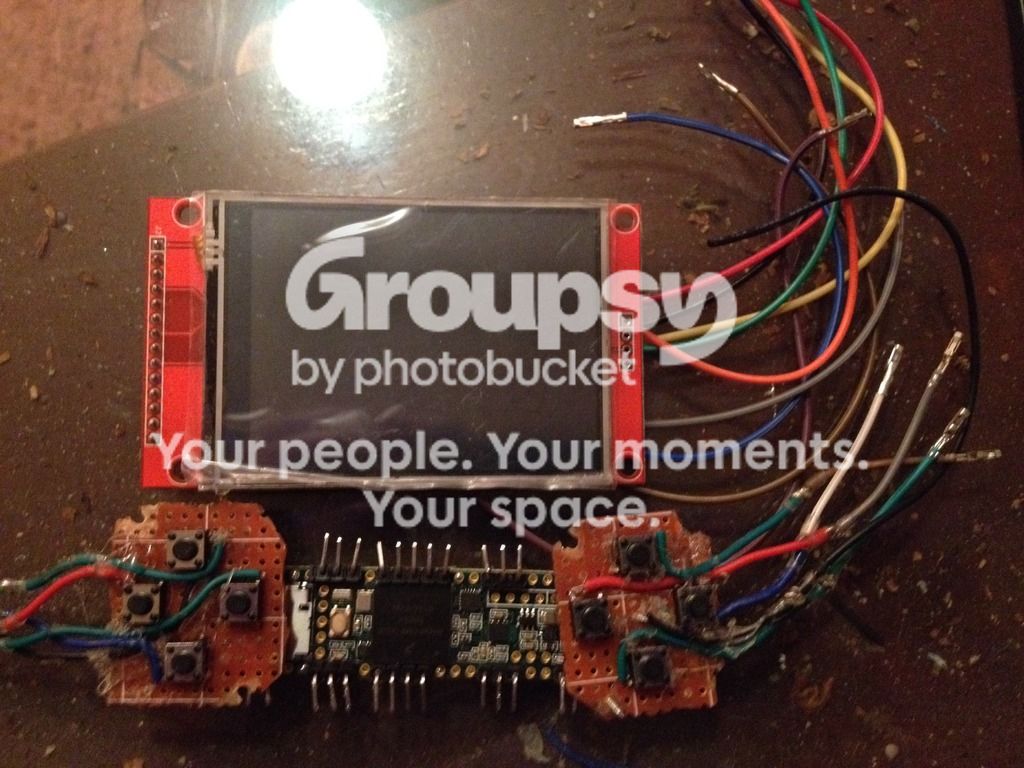
Edit::::
Heres the case for the 2.8. Its a lil thicker at 19mm but the extra space can be used for extra stuff like the sd card and charger and wiring. All right so the buttons will fit along a long piece of breadboard. I moved the start and select buttons up closer to the screen to i can use that lil space as a common ground for buttons and stuff. The shoulders are on top but will be tricky. Well it will be fine as long as your not a perfectionist.
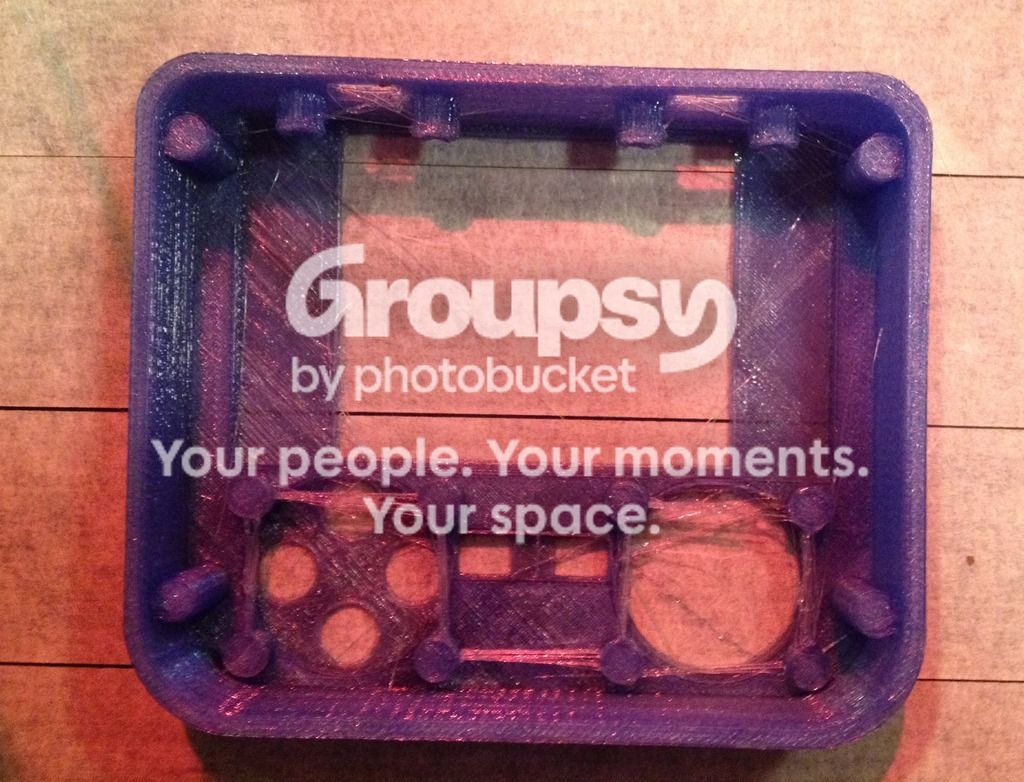
Ok with the chance of being able to procure the smaller 2.2inch screens dwindling daily.... It's come to mind that I need to make some changes to the case designs. The long octoganal shape will end up being 162mm wide with the 2.4inch and about 185mm wide with the 2.8inch. That's as long and longer than a PSVita. Granted I can get the case to under 20mm thick on the profile but it's not really pocket sized.
So I'm looking at different shapes and thought about going back to a folder when I got an idea.....
I love robots especially Hexapods. They just intrigue me. Any way I ran across a thing on thingiverse that's a modular 3D printed snake type robot. Each part has its own power and micro controller. One of the features that made it all work together was neodymium magnets. They not helped attach the snake modules together but they are also connected to the MCU wiring so they can all be used at once or one at a time.
So what I was thinking was maybe I could design a modular system with a core holding the battery the TFT and the screen. Then you could attach extras like d-pad and ABXY buttons on either end or on the bottom. Then other things could be created to attach. This is especially true with the ESP boards. Since any pin can be any pin you could literally build it into any thing for Iot.
I need some ideas. What would guys like to see in a case? What do you think about the sizes I listed?
https://tams.informatik.uni-hamburg.de/ ... clawar.pdf
Ok so I got on my computer and starting playing with 123design and first made a 3D rendered version of the screen. Then I tried a couple things with a one piece but I think it would be better to make a two piece folder. With some clever engineering I can make it 24mm to 26mm total closed and about 13mm open. Or make the bottom and top to connect via magnets and wire then like mentioned above. The battery would be on the back of the screen in the top case with the buttons and your MCU of choice in the bottom case with the buttons.
Edit:::
Ugg I just can't seem to figure out how to do the case but I might have an idea........
I got some dummy parts and started moving stuff around trying to come up with a solution that works and allows the hardware needed and at the smallest possible configuration. So I came up with a square or more like a rectangle barely rectangled.
Have the screen at the top with the dpad and ABXY directly below the screen. Haven't quite figured out the shoulders yet though. The start and select will probably be on the profile or not. For the 2.8 inch we are looking at 95x80x15mm, smaller for the 2.4. Of course.
So to get it so flat I'll imbed the screen into the case along with the button pad circles so the buttons large circle of the button pieces fit flush with the case. Now for sure the battery will have to be attached to he back of the TFT. Then there should be plenty of room to add the MCU behind the button pads to make it as thin as as I can.
Still pocket size at that.

Edit::::
Heres the case for the 2.8. Its a lil thicker at 19mm but the extra space can be used for extra stuff like the sd card and charger and wiring. All right so the buttons will fit along a long piece of breadboard. I moved the start and select buttons up closer to the screen to i can use that lil space as a common ground for buttons and stuff. The shoulders are on top but will be tricky. Well it will be fine as long as your not a perfectionist.

Duhjoker Sat Apr 15, 2017 8:22 am
More pics. Remember this is just a dummy. I havent added ports or any thing and i think ill have the shoulder buttons either on the side about midway or on the back. Its definitely not working where they are.
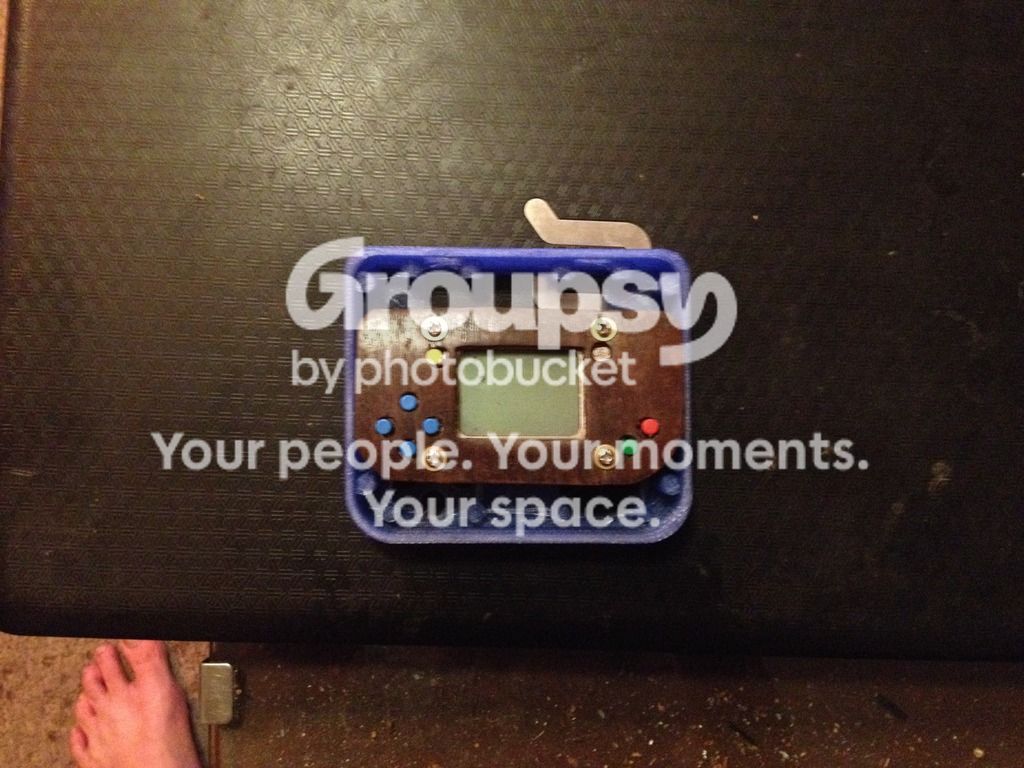
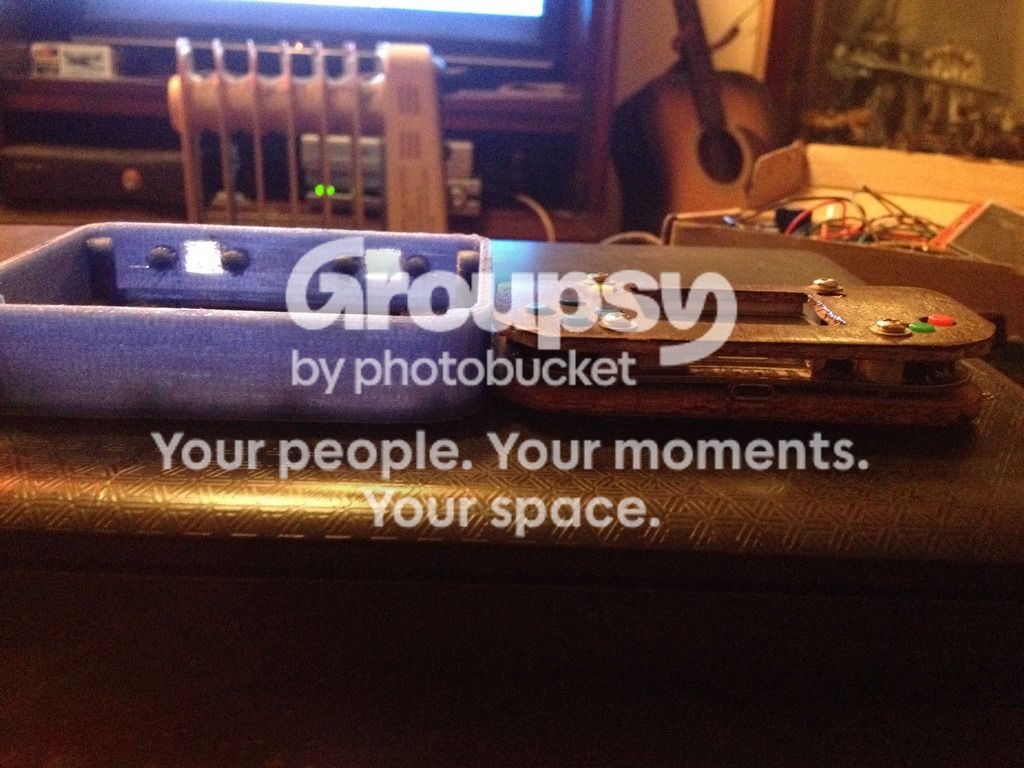
What do you think of the name Gamebuino Squared?
EDIT:: ok so I was trying to make the library fully compatible with most hardware options is going to be a lot of work that I'm not ready for yet. I do have it but untested. any way what I think I'll do is just make that separate from the ARM version. Especially since the NES emu will have a separate file as well.


What do you think of the name Gamebuino Squared?
EDIT:: ok so I was trying to make the library fully compatible with most hardware options is going to be a lot of work that I'm not ready for yet. I do have it but untested. any way what I think I'll do is just make that separate from the ARM version. Especially since the NES emu will have a separate file as well.
Duhjoker Thu Apr 20, 2017 7:34 am
I've got some awesome news for any one that wants to play with a 16bit gaming device. Any arduino!!!
I've been on the pjrc site getting help for the frame buffer to the esp32 library. And I mentioned that the only only thing stopping any one from doing this with any MCU was the flash storage problem and enough RAM enough to supply the buffer.
Well one thing led to the next and I found a nice lil goodie for flash but I'm still working on the RAM.
Here take a peep at this..........
http://pages.ebay.com/link/?nav=item.vi ... ID=EBAY-US
Edit::::::
Just found ram but it will have to be soldered to a board...........
http://pages.ebay.com/link/?nav=item.vi ... ID=EBAY-US
Update::: finished the esp32 library so now we can build a color gaming system for almost any mcu. Of course with RAM and Flash extension any one can be capable.
Giant thank you to KurtE for his time and help to make most of this posible.
Esp-----------------------
3.3v-------3.3v
GND-------gnd
CS---------------------22
Reset------3.3v
DC---------------------5
MOSI-------------------23
SCK--------------------18
LED---------3.3v
Miso-------------------19
Teensy3.2-3.6-------------------
VCC---------3.3v
GND---------GND
CS-------------------------10
RESET-------3.3v
DC--------------------------9
MOSI------------------------11
SCK-------------------------13
LED---------3.3v
MISO------------------------12
Battery --------------------3.7v lipo!!!!!! No step up!!!
Charger---------------------Tp4056
Be sure to power your MCU with the battery directly attach to a charger. 5v will cause excessive heat on the TFT and drain your battery too power too quickly, like 45minutes.
When creating button modules...... I usually attach the wires from the button side and glue wires after soldering from the back. This kills about 3 to 5 millimeters and then you insulate the button backs and you have space for extra components with out adding bulk to the profile.
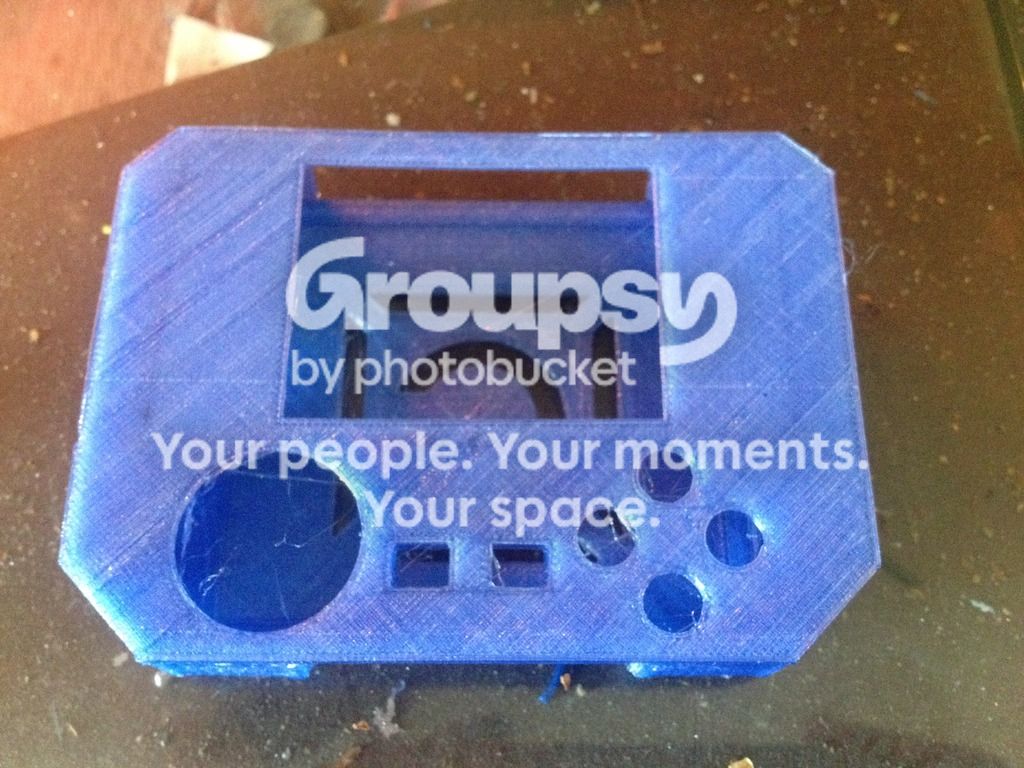
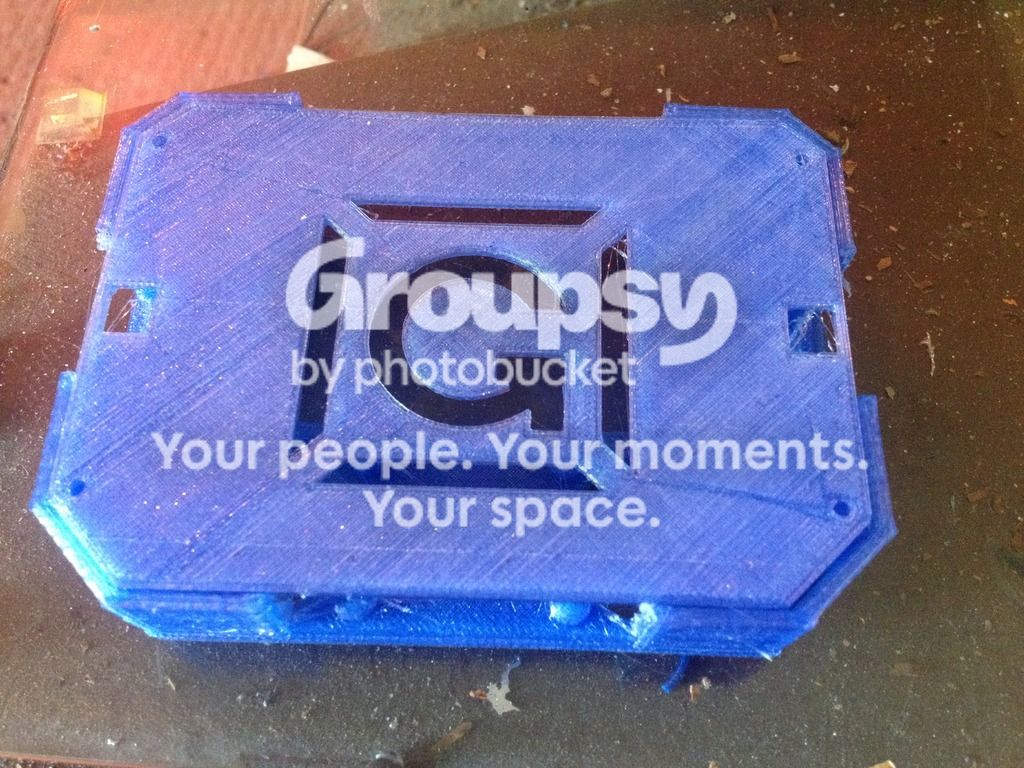
Edit::: I ended up having to change where the L and R buttons go several times over to get them in a comfortable enough place. Now they should be where your index fingers can hit them naturally and they will install to the back. I also removed the G for now but kept the square for ventilation purposes. I also added a couple extra mm to the profile which will make it easier for to get every thing packed in.
Ok if you want SD capability for bitmaps check your Teensy libraries. Specifically arduino/hardware/teensy/avr/libraries/adafruit_ili9341/example/spitftbitmap/spitftbitmap.ino. I'm going to be adding it to the library tonight and I'll leave a link to my Dropbox for the updated library.
Haven't quite figured out how to use it quite yet but this should help ease of progmem. I dont think you can use tilemap with it but you can always store your tilemap as one big bitmap on the so card. Also wouldn't know how to add the collision detection since it tells which bitmaps are supposed to be solid.
Edit::
Added the 2.4tft case version in the case zip. I screw turrets for the 2.4tft's buttons are the same for both the 2.4 and 2.8 so if you decide to change TFT sizes you can use the same button breadboard.
Edit:::::
I was wrong about the buttons!!! There's a difference in length of about 5mm.
Heres a pic with both the 2.4 and 2.8
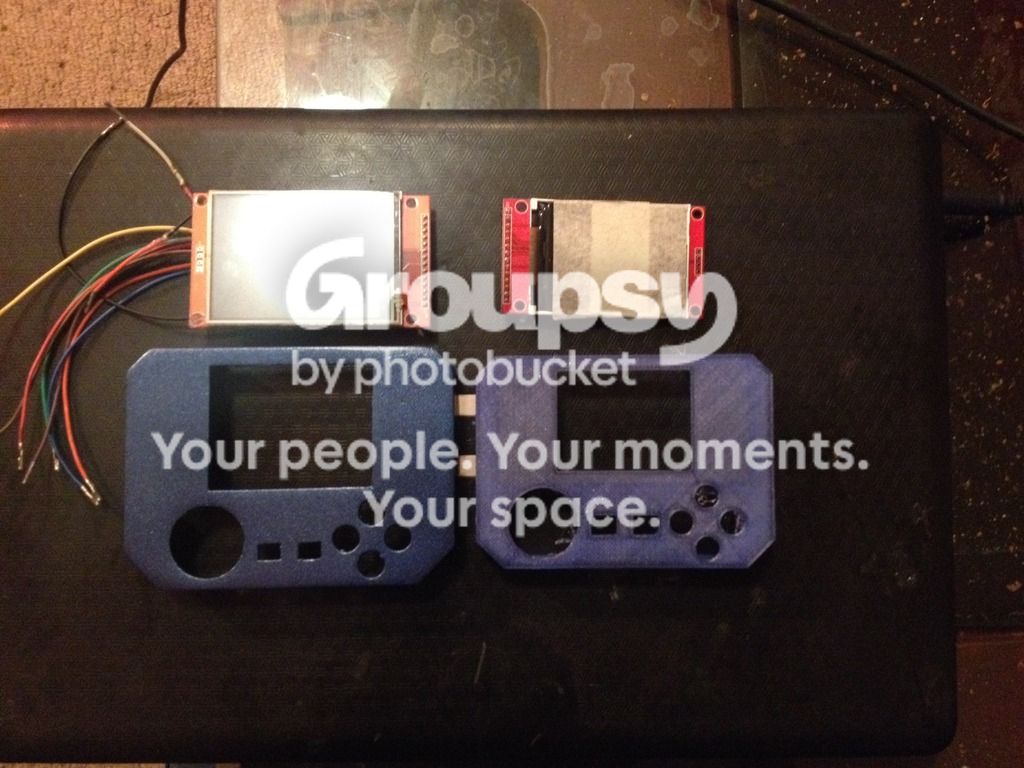
Edit:: heres a list of compatible tft's
https://www.ramtex.dk/display-controlle ... li9341.htm
I've been on the pjrc site getting help for the frame buffer to the esp32 library. And I mentioned that the only only thing stopping any one from doing this with any MCU was the flash storage problem and enough RAM enough to supply the buffer.
Well one thing led to the next and I found a nice lil goodie for flash but I'm still working on the RAM.
Here take a peep at this..........
http://pages.ebay.com/link/?nav=item.vi ... ID=EBAY-US
Edit::::::
Just found ram but it will have to be soldered to a board...........
http://pages.ebay.com/link/?nav=item.vi ... ID=EBAY-US
Update::: finished the esp32 library so now we can build a color gaming system for almost any mcu. Of course with RAM and Flash extension any one can be capable.
Giant thank you to KurtE for his time and help to make most of this posible.
Esp-----------------------
3.3v-------3.3v
GND-------gnd
CS---------------------22
Reset------3.3v
DC---------------------5
MOSI-------------------23
SCK--------------------18
LED---------3.3v
Miso-------------------19
Teensy3.2-3.6-------------------
VCC---------3.3v
GND---------GND
CS-------------------------10
RESET-------3.3v
DC--------------------------9
MOSI------------------------11
SCK-------------------------13
LED---------3.3v
MISO------------------------12
Battery --------------------3.7v lipo!!!!!! No step up!!!
Charger---------------------Tp4056
Be sure to power your MCU with the battery directly attach to a charger. 5v will cause excessive heat on the TFT and drain your battery too power too quickly, like 45minutes.
When creating button modules...... I usually attach the wires from the button side and glue wires after soldering from the back. This kills about 3 to 5 millimeters and then you insulate the button backs and you have space for extra components with out adding bulk to the profile.


Edit::: I ended up having to change where the L and R buttons go several times over to get them in a comfortable enough place. Now they should be where your index fingers can hit them naturally and they will install to the back. I also removed the G for now but kept the square for ventilation purposes. I also added a couple extra mm to the profile which will make it easier for to get every thing packed in.
Ok if you want SD capability for bitmaps check your Teensy libraries. Specifically arduino/hardware/teensy/avr/libraries/adafruit_ili9341/example/spitftbitmap/spitftbitmap.ino. I'm going to be adding it to the library tonight and I'll leave a link to my Dropbox for the updated library.
Haven't quite figured out how to use it quite yet but this should help ease of progmem. I dont think you can use tilemap with it but you can always store your tilemap as one big bitmap on the so card. Also wouldn't know how to add the collision detection since it tells which bitmaps are supposed to be solid.
Edit::
Added the 2.4tft case version in the case zip. I screw turrets for the 2.4tft's buttons are the same for both the 2.4 and 2.8 so if you decide to change TFT sizes you can use the same button breadboard.
Edit:::::
I was wrong about the buttons!!! There's a difference in length of about 5mm.
Heres a pic with both the 2.4 and 2.8

Edit:: heres a list of compatible tft's
https://www.ramtex.dk/display-controlle ... li9341.htm
Duhjoker Sun May 07, 2017 6:33 am
Ok first I want to thank Rodot for letting us do this here.
Ok so in the link below is the master zip file for the gamebuino squared project including .stl's for the 2.8 and 2.4 case, assembly pics, the main library, SpiN-master and esp32 library. There's been a few changes for optimization and I added a readme file that includes instructions on how to build, TFT wiring and some other good stuff. Just unpack and go.
Changed name to GameRIot. Rodot hasn't said anything about the name though this is a Gamebuino project, I decided it would save trouble to go ahead and rename the library system. All credits have now also been included.
https://www.dropbox.com/s/n4sjs7w41ejob ... e.zip?dl=0
I did not mention the rear L and R buttons which are there but optional.
Edit::::
I timed this pic just right!!!!
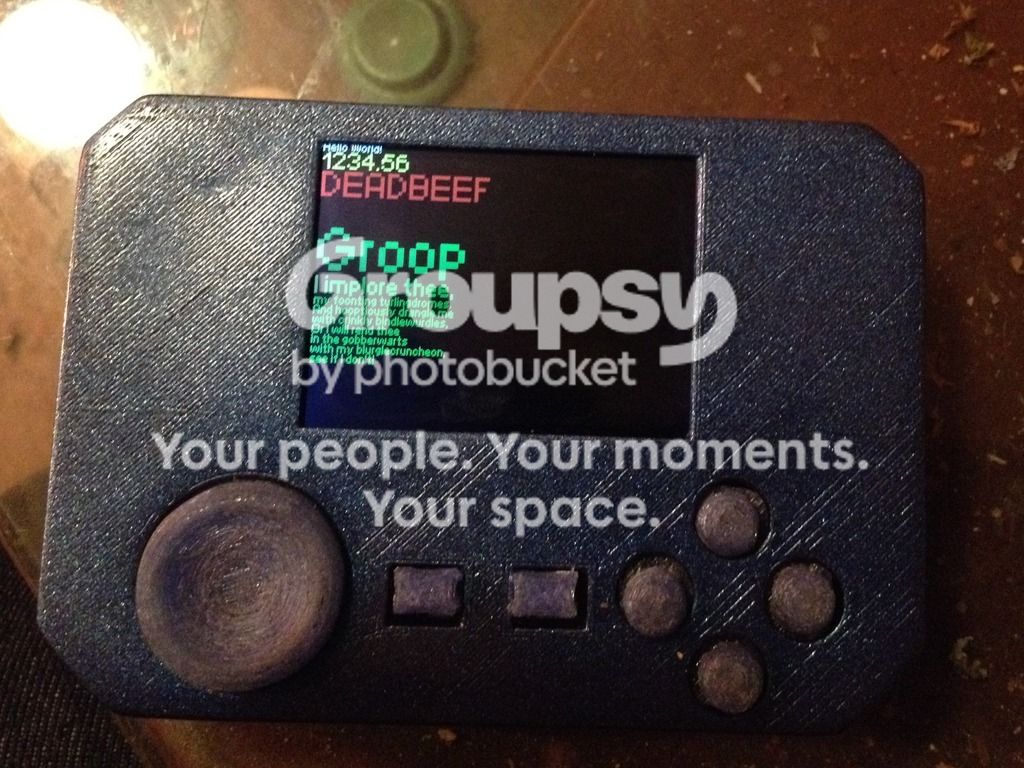
Heres a pic from the side, its just 21mm thick. Average but the piGrrl and the rest of the pi products end up being around 28mm.
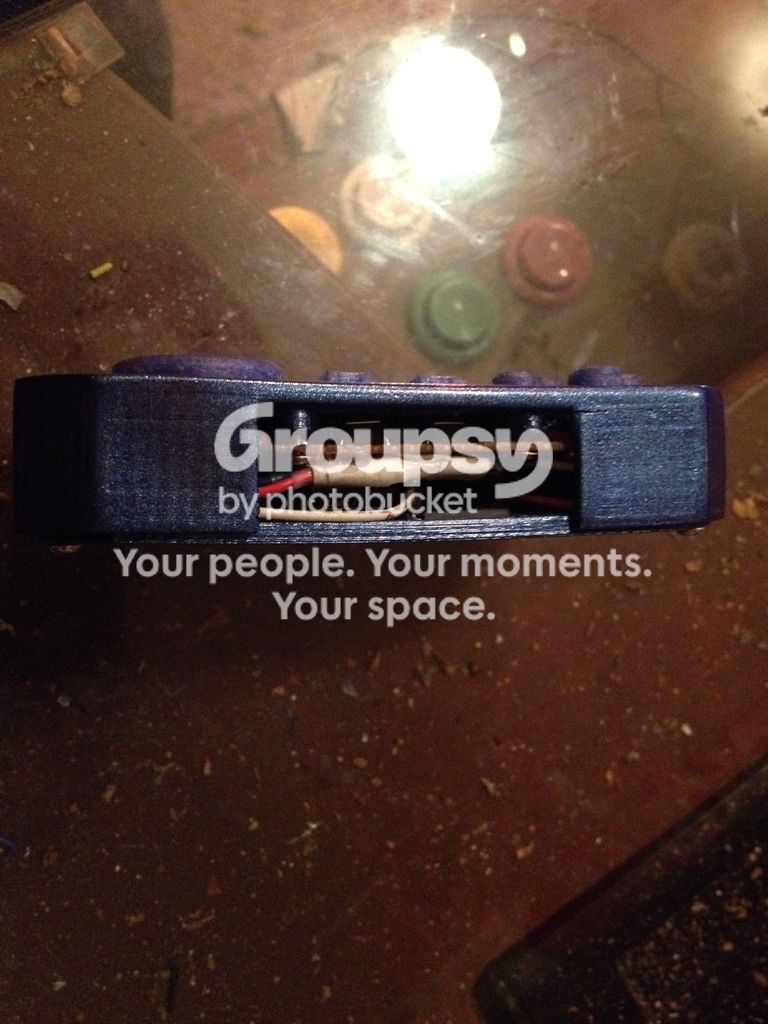
Still need to add the l and r buttons.
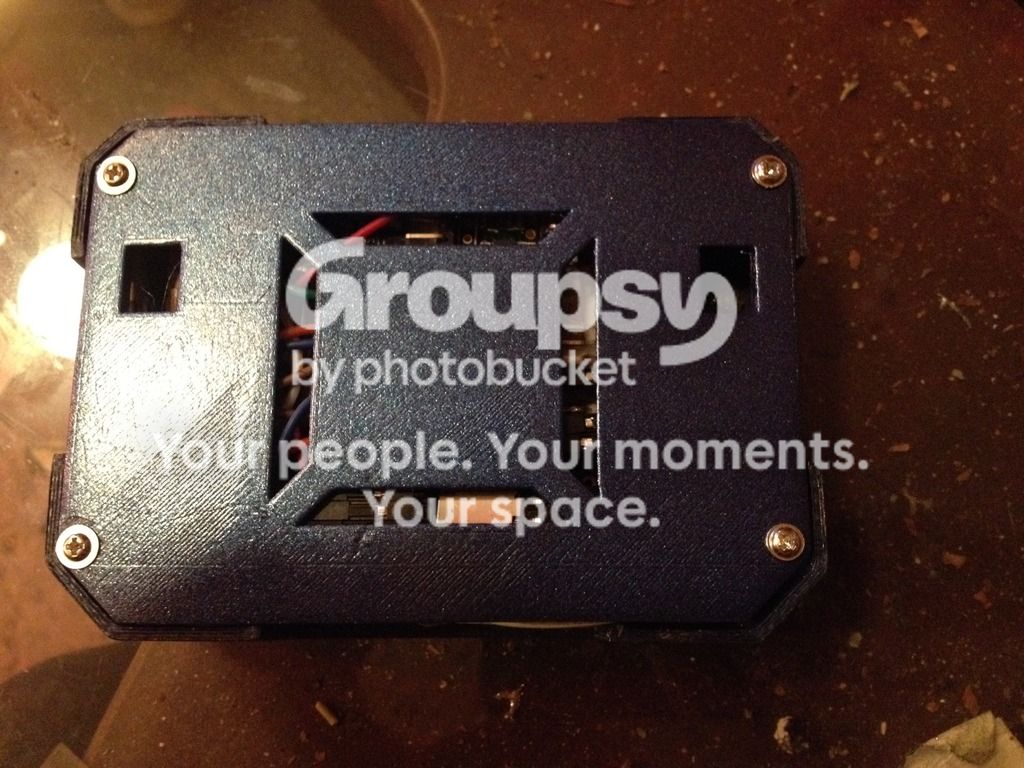
Here's a link to the Facebook group please join for support and updates
https://www.facebook.com/groups/1884138545176856/
Edit:::::
Ok quick tip from the pjrc site..... On the back of your TFT near the voltage regulator is lil pad that has to solder points to them. This is called J1. Solder those two pads together and your TFT will light up brighter.
On the 2.4inch case and 2.8inch case....... I'm pretty good at playing 3D Tetris so I squeezing a bunch a gear into a case is not much of a problem. But gear may vary in size. So in order to correct the problem if one arises with depth, I made the back lid 3mm with a 2mm recession in it. That will help a lil and you can always use longer screws and washers in between the case and back as well. I gave the screw turrets about 7mm diameter and they are fused to the case so you can do what you need to do.
Don't know what I'm going to do about left and right shoulder buttons. Due to wiring there's really no way to add them. Maybe in future incarnations.
A few word about 3D printing. I've been ordering and recently printing out my own 3D designs for a few years now. And if it's one thing I have learned its that there's no way to get a perfect print. I designed each part with enough room so every fits together loosely but that doesn't mean every thing will fit perfectly so sanding and filing will have to be used to correct the problem areas.
I have three files I use for cleaning up prints. A cylinder file to clean up holes, a flat file and a triangle file. A razor blade help too as when filing plastic builds around the edges you filed, just gently cut off the excess.
Since this is a multiple MCU platform for gaming almost any MCU can be used. That means stuff can go where ever you can fit it. In that I did not add a hole for the teensy reset button. You will want to do this yourself with a drill to ensure proper placement.
How you guys doing with your builds?
Ok so in the link below is the master zip file for the gamebuino squared project including .stl's for the 2.8 and 2.4 case, assembly pics, the main library, SpiN-master and esp32 library. There's been a few changes for optimization and I added a readme file that includes instructions on how to build, TFT wiring and some other good stuff. Just unpack and go.
Changed name to GameRIot. Rodot hasn't said anything about the name though this is a Gamebuino project, I decided it would save trouble to go ahead and rename the library system. All credits have now also been included.
https://www.dropbox.com/s/n4sjs7w41ejob ... e.zip?dl=0
I did not mention the rear L and R buttons which are there but optional.
Edit::::
I timed this pic just right!!!!

Heres a pic from the side, its just 21mm thick. Average but the piGrrl and the rest of the pi products end up being around 28mm.

Still need to add the l and r buttons.

Here's a link to the Facebook group please join for support and updates
https://www.facebook.com/groups/1884138545176856/
Edit:::::
Ok quick tip from the pjrc site..... On the back of your TFT near the voltage regulator is lil pad that has to solder points to them. This is called J1. Solder those two pads together and your TFT will light up brighter.
On the 2.4inch case and 2.8inch case....... I'm pretty good at playing 3D Tetris so I squeezing a bunch a gear into a case is not much of a problem. But gear may vary in size. So in order to correct the problem if one arises with depth, I made the back lid 3mm with a 2mm recession in it. That will help a lil and you can always use longer screws and washers in between the case and back as well. I gave the screw turrets about 7mm diameter and they are fused to the case so you can do what you need to do.
Don't know what I'm going to do about left and right shoulder buttons. Due to wiring there's really no way to add them. Maybe in future incarnations.
A few word about 3D printing. I've been ordering and recently printing out my own 3D designs for a few years now. And if it's one thing I have learned its that there's no way to get a perfect print. I designed each part with enough room so every fits together loosely but that doesn't mean every thing will fit perfectly so sanding and filing will have to be used to correct the problem areas.
I have three files I use for cleaning up prints. A cylinder file to clean up holes, a flat file and a triangle file. A razor blade help too as when filing plastic builds around the edges you filed, just gently cut off the excess.
Since this is a multiple MCU platform for gaming almost any MCU can be used. That means stuff can go where ever you can fit it. In that I did not add a hole for the teensy reset button. You will want to do this yourself with a drill to ensure proper placement.
How you guys doing with your builds?
awesome101 Mon May 29, 2017 2:35 pm
Some of my parts have still not arrived. I'm planning on building mine next week though. How is the tile map going
erico Mon May 29, 2017 8:21 pm
Looks pretty great! Me likes it! :)
Specially the round pad.
Specially the round pad.
Duhjoker Tue May 30, 2017 12:49 am
Omg i had to take a break from the tilemap. We had family in yesterday so i didnt really get caught back up today. I eent ahead amd switched back to the T3.6. The esp is awesome and all that but i have no sd card reader so i cant test the new draw from sd functionality. Also gonna try to get Bounce up and going instead of the standard Buttons.h. According to the folks at pjrc this will work better. Cool thing is most of the example is every thing i need so i just have to update it a hair.
Kurt pointed out something else to look for tile mapping at but i havent had a chance to read it through. Im free tonight so im going to try to get around to testing out what he has offered.
Yea i like the round button my self but it was more out of neccessity. Cramming as much as we are into a thin pocket sized device calls for extra engineering. It was actually easier and looked better. I made a new back last night from a template and finished it. Every thing was being compressed so i wanted to relieve it. I kept the G and moved the shoulders once more trying to fit them in. Think i might actually have it this time.
Awesome101!! I really appreciate your help and we will eventually get it!!! Glad to hear your hardware is near. I did some work on the 2.8 case to make it a lil smaller. It should fit your hardware just fine. But im curious about the battery size. If you can throw that my way if its over 5mm thick and ill adjust the case for you to print.
You can find support for me directly on Facebook. Look for GameRIot and join in. This will save forum space and make things a lil easier to work together.
Rodot and sorunome have been very gracious so far to lend us forum space to host us and i dont want to take advantage of that either. Thanks you to both.
Or you can contact me at GameRiotadvancedgaming@yahoo.com.
Kurt pointed out something else to look for tile mapping at but i havent had a chance to read it through. Im free tonight so im going to try to get around to testing out what he has offered.
Yea i like the round button my self but it was more out of neccessity. Cramming as much as we are into a thin pocket sized device calls for extra engineering. It was actually easier and looked better. I made a new back last night from a template and finished it. Every thing was being compressed so i wanted to relieve it. I kept the G and moved the shoulders once more trying to fit them in. Think i might actually have it this time.
Awesome101!! I really appreciate your help and we will eventually get it!!! Glad to hear your hardware is near. I did some work on the 2.8 case to make it a lil smaller. It should fit your hardware just fine. But im curious about the battery size. If you can throw that my way if its over 5mm thick and ill adjust the case for you to print.
You can find support for me directly on Facebook. Look for GameRIot and join in. This will save forum space and make things a lil easier to work together.
Rodot and sorunome have been very gracious so far to lend us forum space to host us and i dont want to take advantage of that either. Thanks you to both.
Or you can contact me at GameRiotadvancedgaming@yahoo.com.
awesome101 Tue May 30, 2017 1:06 am
Thanks man I'm really excited for this console too!!
Duhjoker Tue May 30, 2017 7:53 am
I've got some tips for you. Something's I wish I had known and step by step instruction.
It doesn't take long to get the piece you are soldering hot enough so practice soldering some pins to bread board. It would be a good idea to make your self a relay. By which I mean, solder 5 rows of 5 pins to a perfboard one to two rows apart then solder pins across each bank connecting them from the the bottom. Then solder three to four pins down and then solder a switch to the prongs. Now you can test power and stuff.
Flux, flux flux!!! You should always flux before soldering, this helps clean the surface and acts like a primer to help adhere the solder to the joints. I usually make sure to get a lil in the via holes so it helps gravity do its job and seal the pins correctly to the board.
Disclaimer on flux. Some times the Teflon coated jumpers I use have a hard time soldering not only to each other but pins as well. The best way that I've found so far is shorten each wire first so you are not jerking on soldered wire and creating small breaks in the wire. Some times the twisting motion will help remove any Teflon which is the cause. I've heard of heating them first but that could kill the wire completely.
Use a razor blade to gently cut the Teflon then carefully twist lightly and pull. Try to take enough Teflon off that there is a lil excess wire. A lil over a quarter inch. After twisting together like bailing wire, wrap the excess around wire around the joint. Then flux and solder. If it doesn't seem like it soldered that's ok, the excess wrapped wire will ensure that the connection holds. Just shrink wrap and try not to jerk on the wires and just pull them at the female joint.
With this project I found its easier to remove the plastic clip from the jumper then shrink tubing the end so they don't short. This is so you can see and check that the connection is tight and fully on the pin. I usually don't solder to my boards that way I can do quick changes and test different MCU's. The plastic clips don't always allow you to get a firm connection due to an offset and they slip off easily.
Your screen will use three power wires and one ground. Start by making yourself a piece of wire just long enough with extra bare wire to flip the TFT to the front and solder that wire from the power to the LED pin. They run off the same voltage so it's safe. This makes it easier to power it thus far.
Now take a set of pins and make two banks of three. Now remove two pins from another set of pins. Now push the plastic clip down and solder a pin across all three pins each set of three. These are lil relays we will use for power. More on that later.
Now you need to bend the pins on your TFT. Very carefully using a wire jumper with the plastic clip intact. Now take a set of wires enough to populate the pins on the TFT and shorten them about by half. Do not populate the LED pin as we fixed that earlier. Also leave the power, the ground, the reset and the SCK wire long.
You will also need to solder the pins tour MCU so the long part is on top. Then bend the pins over using jumpers with plastic clips. It should now be about 5mm thick whole looking at the profile and will allow it to compact enough to fit in the case.
Now solder all these wires to the TFT then shrink tube the clips so no shorting. Now you have a plug and play TFT module ready to go. To actually power it there are a few different ways to go. First make a switch and hot glue the wires to secure them to the switch. Just mind the sides that no glue goes inside.
Next take two whole jumpers preferably red and black then remove some Teflon and connect each wire together where it makes two wires. Now stick each set into your lipo's output visa and solder into place. If using adafruit powerboost skip this part. And now you have a plug and play charge module.
Connect the correct battery lead to one wire each on the charger then connect the positive to your switch. At this point carefully glue your TFT into the case. If it's an uneven or red PCB move all the way to right or left to center screen. If a centered screen, center then glue. To do this just squirt a lil glue through the mounting holes in the TFT. Just a lil and one at a time. Too much will melt the plastic. Then add another squirt to the top of each hole to affix it better getting some glue on the back of the TFT PCB. Now wrap your lipo up in tape to insulate it. I use masking. Unsafe I know but you can buy the right stuff if you prefer. Then glue the battery down to your TFT. Then glue the charger to one side of the battery leaving room for the MCU on the other. Now install your switch to the case with a screw.
Now it's button time. You will need a piece of perfboard that's 90mm by 30. Place two holes on both side at the top at 80mm apart. Try to drill the holes starting in a via hole. This will insure that the perfboard won't crack and break their. Or just make the peice then mark it yourself. Either way only do the two top furthest away then the close two on the bottom.
It should be a lil big. If it doesn't fit sand each edge or file it til it does fit then drill holes. Next place tactile switches in a cross on both sides of the perfboard with two in between the left and right inside button cross. Use the case to help you get the buttons aligned properly by placing it in and removing it.
Flip it over now and start in the middle by connecting one prong each of the select and start buttons with a pin removed from a pin bank. In some cases it's easier to bend the prongs in angle you need them but be careful they will break. Now solder a pin from the select and start buttons to the left side right button and the right side left button. Now connect the down buttons on n each side then the far left and righ buttons then the top buttons in a chain or in series. There should be a common ground shared by all buttons.
Next take 4 jumpers and fold them in half and cut. Then peel the cut ends apart about 1/2 inch. Remove some Teflon coating and solder a wire to an empty pin on each button. Now add some hot glue to the center of the soldered wires then push them down into the glue to make them more secure to the board for further manipulation.
Now take two more wires and cut them in half. Take two of the same color and solder each to an empty pin on the select and start buttons. Now tak a third half and solder it to a ground rail on the new plug and play button pad module. Secure each select and start to their respects give sides away from the joint with glue. Leave enough slack to reach high. Now center the button ground and secure with hot glue.
The ground wire for the buttons goes to the ground on the MCU. Not to be confused with the input main ground. For a t3.1/2 these will be next to 3.3v out put pin on the board side opposite the USB input. For t3.5/6 the ground will be under pin 13 on the right side.
Now we add the MCU and do final wiring. So hot glue the MCU to the battery opposite the charger. Closest to the switch.
Ok from here you can use the two little three pin relays we made earlier and connect the switch to the relay then add the TFT power to that and insulate. Connecting the 3.7v lipo battery to the screen will not hurt it but makes it a comfortable bright glow.
Or you can connect the Reset wire and the TFT power wire to a relay and run both to the 3.3v output of the MCU but this much less bright. You could also connect the reset pin to the LED pin that we soldered a wire to on the front and power both off one wire 3.3v or use the 3.7v relay.
Now take the other three pin relay and connect both the Chargers remaining wire and the TFT's ground and then run to the main ground on the MCU. Now wire the spi wires to the MCU soldering if you please but insulate with shrink tube.
Once the TFT is properly wired to the board and powered flip the switch to check for power on the teensy and the TFT. Now load your test demo and turn again. If ESP it will show picture immediately if teensy count 5 Mississippi's. Or do the jeopardy music.
If you get a picture turn off and add button wires to MCU and settings file then test. If you don't get a picture check your wiring and connections. Next add your button wires to the board and run a test sketch to check them. You could start telling it to display a certain bitmap or colored bitmap with each different button press.
I will be updating the buttons to use bounce soon which PJRC reccomends. It's pretty simple set up though and means I can drop the buttons.h and .cpp and trade for bounce.h and .cpp but the button stuff will be included in the Grafx library. Arduino can use bounce too so don't freak out though I think rodots will work best with arduino.
Take a look at esp32. The boards are a lil cheaper than T3.2 but has enough ram and flash to run huge games at 4mb flash. Plenty enough ram to run the screen and have plenty left over. Then there's the two cores that can run graphics on one and game data on the other but I'm still reading about that.
It doesn't take long to get the piece you are soldering hot enough so practice soldering some pins to bread board. It would be a good idea to make your self a relay. By which I mean, solder 5 rows of 5 pins to a perfboard one to two rows apart then solder pins across each bank connecting them from the the bottom. Then solder three to four pins down and then solder a switch to the prongs. Now you can test power and stuff.
Flux, flux flux!!! You should always flux before soldering, this helps clean the surface and acts like a primer to help adhere the solder to the joints. I usually make sure to get a lil in the via holes so it helps gravity do its job and seal the pins correctly to the board.
Disclaimer on flux. Some times the Teflon coated jumpers I use have a hard time soldering not only to each other but pins as well. The best way that I've found so far is shorten each wire first so you are not jerking on soldered wire and creating small breaks in the wire. Some times the twisting motion will help remove any Teflon which is the cause. I've heard of heating them first but that could kill the wire completely.
Use a razor blade to gently cut the Teflon then carefully twist lightly and pull. Try to take enough Teflon off that there is a lil excess wire. A lil over a quarter inch. After twisting together like bailing wire, wrap the excess around wire around the joint. Then flux and solder. If it doesn't seem like it soldered that's ok, the excess wrapped wire will ensure that the connection holds. Just shrink wrap and try not to jerk on the wires and just pull them at the female joint.
With this project I found its easier to remove the plastic clip from the jumper then shrink tubing the end so they don't short. This is so you can see and check that the connection is tight and fully on the pin. I usually don't solder to my boards that way I can do quick changes and test different MCU's. The plastic clips don't always allow you to get a firm connection due to an offset and they slip off easily.
Your screen will use three power wires and one ground. Start by making yourself a piece of wire just long enough with extra bare wire to flip the TFT to the front and solder that wire from the power to the LED pin. They run off the same voltage so it's safe. This makes it easier to power it thus far.
Now take a set of pins and make two banks of three. Now remove two pins from another set of pins. Now push the plastic clip down and solder a pin across all three pins each set of three. These are lil relays we will use for power. More on that later.
Now you need to bend the pins on your TFT. Very carefully using a wire jumper with the plastic clip intact. Now take a set of wires enough to populate the pins on the TFT and shorten them about by half. Do not populate the LED pin as we fixed that earlier. Also leave the power, the ground, the reset and the SCK wire long.
You will also need to solder the pins tour MCU so the long part is on top. Then bend the pins over using jumpers with plastic clips. It should now be about 5mm thick whole looking at the profile and will allow it to compact enough to fit in the case.
Now solder all these wires to the TFT then shrink tube the clips so no shorting. Now you have a plug and play TFT module ready to go. To actually power it there are a few different ways to go. First make a switch and hot glue the wires to secure them to the switch. Just mind the sides that no glue goes inside.
Next take two whole jumpers preferably red and black then remove some Teflon and connect each wire together where it makes two wires. Now stick each set into your lipo's output visa and solder into place. If using adafruit powerboost skip this part. And now you have a plug and play charge module.
Connect the correct battery lead to one wire each on the charger then connect the positive to your switch. At this point carefully glue your TFT into the case. If it's an uneven or red PCB move all the way to right or left to center screen. If a centered screen, center then glue. To do this just squirt a lil glue through the mounting holes in the TFT. Just a lil and one at a time. Too much will melt the plastic. Then add another squirt to the top of each hole to affix it better getting some glue on the back of the TFT PCB. Now wrap your lipo up in tape to insulate it. I use masking. Unsafe I know but you can buy the right stuff if you prefer. Then glue the battery down to your TFT. Then glue the charger to one side of the battery leaving room for the MCU on the other. Now install your switch to the case with a screw.
Now it's button time. You will need a piece of perfboard that's 90mm by 30. Place two holes on both side at the top at 80mm apart. Try to drill the holes starting in a via hole. This will insure that the perfboard won't crack and break their. Or just make the peice then mark it yourself. Either way only do the two top furthest away then the close two on the bottom.
It should be a lil big. If it doesn't fit sand each edge or file it til it does fit then drill holes. Next place tactile switches in a cross on both sides of the perfboard with two in between the left and right inside button cross. Use the case to help you get the buttons aligned properly by placing it in and removing it.
Flip it over now and start in the middle by connecting one prong each of the select and start buttons with a pin removed from a pin bank. In some cases it's easier to bend the prongs in angle you need them but be careful they will break. Now solder a pin from the select and start buttons to the left side right button and the right side left button. Now connect the down buttons on n each side then the far left and righ buttons then the top buttons in a chain or in series. There should be a common ground shared by all buttons.
Next take 4 jumpers and fold them in half and cut. Then peel the cut ends apart about 1/2 inch. Remove some Teflon coating and solder a wire to an empty pin on each button. Now add some hot glue to the center of the soldered wires then push them down into the glue to make them more secure to the board for further manipulation.
Now take two more wires and cut them in half. Take two of the same color and solder each to an empty pin on the select and start buttons. Now tak a third half and solder it to a ground rail on the new plug and play button pad module. Secure each select and start to their respects give sides away from the joint with glue. Leave enough slack to reach high. Now center the button ground and secure with hot glue.
The ground wire for the buttons goes to the ground on the MCU. Not to be confused with the input main ground. For a t3.1/2 these will be next to 3.3v out put pin on the board side opposite the USB input. For t3.5/6 the ground will be under pin 13 on the right side.
Now we add the MCU and do final wiring. So hot glue the MCU to the battery opposite the charger. Closest to the switch.
Ok from here you can use the two little three pin relays we made earlier and connect the switch to the relay then add the TFT power to that and insulate. Connecting the 3.7v lipo battery to the screen will not hurt it but makes it a comfortable bright glow.
Or you can connect the Reset wire and the TFT power wire to a relay and run both to the 3.3v output of the MCU but this much less bright. You could also connect the reset pin to the LED pin that we soldered a wire to on the front and power both off one wire 3.3v or use the 3.7v relay.
Now take the other three pin relay and connect both the Chargers remaining wire and the TFT's ground and then run to the main ground on the MCU. Now wire the spi wires to the MCU soldering if you please but insulate with shrink tube.
Once the TFT is properly wired to the board and powered flip the switch to check for power on the teensy and the TFT. Now load your test demo and turn again. If ESP it will show picture immediately if teensy count 5 Mississippi's. Or do the jeopardy music.
If you get a picture turn off and add button wires to MCU and settings file then test. If you don't get a picture check your wiring and connections. Next add your button wires to the board and run a test sketch to check them. You could start telling it to display a certain bitmap or colored bitmap with each different button press.
I will be updating the buttons to use bounce soon which PJRC reccomends. It's pretty simple set up though and means I can drop the buttons.h and .cpp and trade for bounce.h and .cpp but the button stuff will be included in the Grafx library. Arduino can use bounce too so don't freak out though I think rodots will work best with arduino.
Take a look at esp32. The boards are a lil cheaper than T3.2 but has enough ram and flash to run huge games at 4mb flash. Plenty enough ram to run the screen and have plenty left over. Then there's the two cores that can run graphics on one and game data on the other but I'm still reading about that.
awesome101 Tue May 30, 2017 4:00 pm
I don't have a 3d printer so I'm using one of my game boy pocket shells to fit another 2.4 ili9341 lcd. It will be a little tight but it should fit
Duhjoker Sun Jun 04, 2017 1:14 am
Ok so I was having a problem using Rodots button library so I've been learning how to use the bounce library as it works best with the teensy3.x. I'm kind of reeling on how fast I figured this all out. After doing many tests to make sure the buttons were working I started adding stuff in.
I need to make a header file at some point but I have the controls set up now using bounce. I had a lil trouble with a repeat function but it was really simple to fix.
Unfortunately that brings us back to the insanity of fixing a few graphical issues. For instance and I've known about since I first loaded a sketch to my teensy. When the character moves he leaves a tron light cycle trail. But he can walk through it lol.
This might be fixed with tiles up though. Ok I'll post the new demo shortly.
Still playing with controls. Ok if you use the sketch above the player moves very easily. But when you add the tilemap he moves very slow. I had to make the the +1 in the movement 5 and it's still a lil annoyingly slow.
You can tweak the milliseconds on the buttons to save power, only updating some fast.
I haven't fixed the tilemap yet I just wanted to see how the player reacts with one behind it.
https://youtu.be/bRqo2YXLKzo
Now on github........
https://github.com/Duhjoker/GameRIot_ESP
https://github.com/Duhjoker/GameRIot-master_gaming
I need to make a header file at some point but I have the controls set up now using bounce. I had a lil trouble with a repeat function but it was really simple to fix.
Unfortunately that brings us back to the insanity of fixing a few graphical issues. For instance and I've known about since I first loaded a sketch to my teensy. When the character moves he leaves a tron light cycle trail. But he can walk through it lol.
This might be fixed with tiles up though. Ok I'll post the new demo shortly.
- Code: Select all
#include <SPI.h>
#include <Grafx.h>
#include <SD.h>
#include <Bounce.h>

/*
Teensy3.x and Arduino's
You are using 4 wire SPI here, so:
 MOSI:  11//Teensy3.x/Arduino UNO (for MEGA/DUE refere to arduino site)
 MISO:  12//Teensy3.x/Arduino UNO (for MEGA/DUE refere to arduino site)
 SCK:   13//Teensy3.x/Arduino UNO (for MEGA/DUE refere to arduino site)
ESP8266-----------------------------------
Use:
#define __CS  16  //(D0)
#define __DC  5   //(D1)
#define __RST 4   //(D2)

 SCLK:D5
 MOSI:D7
 */

#define __CS1    10
#define __DC    9
#define SD_CS 4
#define BUFFPIXEL 20

/*
Teensy 3.x can use: 2,6,10,15,20,21,22,23
Arduino's 8 bit: any
DUE: check arduino site
If you do not use reset, tie it to +3V3
*/

uint8_t errorCode = 0;

Grafx tft = Grafx(__CS1, __DC);

 int player_x = 160;
 int player_y = 110;
 int player_direction = 2;

 int x=-0,y=0;

 //////////Paul_Atreades
//////////paul front

const byte paul_frontblack[] PROGMEM = {16,16,
0x00,0x00,0x00,0x00,0x00,0x00,0x00,0x00,0x00,0x00,0x40,0x02,0x40,0x02,0x30,0x0c,0x38,0x1c,0x4c,0x32,0x4f,0xf2,0x39,0x9c,0x16,0x68,0x11,0x88,0x08,0x10,0x0e,0x70};

const byte paul_frontblue[] PROGMEM = {16,16,
0x00,0x00,0x00,0x00,0x00,0x00,0x00,0x00,0x00,0x00,0x00,0x00,0x02,0x40,0x02,0x40,0x00,0x00,0x00,0x00,0x00,0x00,0x06,0x00,0x01,0x80,0x06,0x60,0x06,0x60,0x00,0x00};

const byte paul_frontbrown[] PROGMEM = {16,16,
0x0e,0x70,0x1b,0xd8,0x16,0x68,0x19,0x98,0x20,0x04,0x16,0x68,0x00,0x00,0x00,0x00,0x00,0x00,0x00,0x00,0x00,0x00,0x00,0x00,0x00,0x00,0x00,0x00,0x00,0x00,0x00,0x00};

const byte paul_frontgreen[] PROGMEM = {16,16,
0x00,0x00,0x00,0x00,0x00,0x00,0x00,0x00,0x00,0x00,0x00,0x00,0x00,0x00,0x00,0x00,0x00,0x00,0x00,0x00,0x00,0x00,0x00,0x60,0x00,0x00,0x00,0x00,0x00,0x00,0x00,0x00};

const byte paul_frontgrey[] PROGMEM = {16,16,
0x00,0x00,0x00,0x00,0x00,0x00,0x00,0x00,0x00,0x00,0x00,0x00,0x00,0x00,0x00,0x00,0x00,0x00,0x00,0x00,0x00,0x00,0x00,0x00,0x08,0x10,0x08,0x10,0x00,0x00,0x00,0x00};

const byte paul_frontpink[] PROGMEM = {16,16,
0x00,0x00,0x00,0x00,0x00,0x00,0x06,0x60,0x0f,0xf0,0x29,0x94,0x3d,0xbc,0x0d,0xb0,0x07,0xe0,0x33,0xcc,0x30,0x0c,0x00,0x00,0x00,0x00,0x00,0x00,0x00,0x00,0x00,0x00};

const byte paul_frontred[] PROGMEM = {16,16,
0x01,0x80,0x04,0x20,0x09,0x90,0x20,0x04,0x10,0x08,0x00,0x00,0x00,0x00,0x00,0x00,0x00,0x00,0x00,0x00,0x00,0x00,0x00,0x00,0x00,0x00,0x00,0x0,0x00,0x00,0x00,0x00};

////////paul_front_walk_1

const byte paul_frontw1black[] PROGMEM = {16,16,
0x00,0x00,0x00,0x00,0x00,0x00,0x00,0x00,0x00,0x00,0x40,0x02,0x40,0x02,0x30,0x0e,0x38,0x1a,0x24,0x3c,0x27,0x98,0x19,0x68,0x0e,0x88,0x0e,0x10,0x00,0x10,0x00,0x70};

const byte paul_frontw1blue[] PROGMEM = {16,16,
0x00,0x00,0x00,0x00,0x00,0x00,0x00,0x00,0x00,0x00,0x00,0x00,0x02,0x40,0x02,0x40,0x00,0x00,0x00,0x00,0x00,0x00,0x06,0x80,0x00,0x60,0x00,0x60,0x00,0x60,0x00,0x00};

const byte paul_frontw1brown[] PROGMEM = {16,16,
0x0e,0x70,0x1b,0xd8,0x16,0x68,0x19,0x98,0x20,0x04,0x16,0x68,0x00,0x00,0x00,0x00,0x00,0x00,0x00,0x00,0x00,0x00,0x00,0x00,0x00,0x00,0x00,0x00,0x00,0x00,0x00,0x00};

const byte paul_frontw1green[] PROGMEM = {16,16,
0x00,0x00,0x00,0x00,0x00,0x00,0x00,0x00,0x00,0x00,0x00,0x00,0x00,0x00,0x00,0x00,0x00,0x00,0x00,0x00,0x00,0x60,0x00,0x00,0x00,0x00,0x00,0x00,0x00,0x00,0x00,0x00};

const byte paul_frontw1grey[] PROGMEM = {16,16,
0x00,0x00,0x00,0x00,0x00,0x00,0x00,0x00,0x00,0x00,0x00,0x00,0x00,0x00,0x00,0x00,0x00,0x00,0x00,0x00,0x00,0x00,0x00,0x10,0x00,0x10,0x00,0x00,0x00,0x00,0x00,0x00};

const byte paul_frontw1pink[] PROGMEM = {16,16,
0x00,0x00,0x00,0x00,0x00,0x00,0x06,0x60,0x0f,0xf0,0x29,0x94,0x3d,0xbc,0x0d,0xb0,0x07,0xe4,0x1b,0xc0,0x18,0x00,0x00,0x00,0x00,0x00,0x00,0x00,0x00,0x00,0x00,0x00};

const byte paul_frontw1red[] PROGMEM = {16,16,
0x01,0x80,0x04,0x20,0x09,0x90,0x20,0x04,0x10,0x08,0x00,0x00,0x00,0x00,0x00,0x00,0x00,0x00,0x00,0x00,0x00,0x00,0x00,0x00,0x00,0x00,0x00,0x00,0x00,0x00,0x00,0x00};

////////paul_front_walk_2

const byte paul_frontw2black[] PROGMEM = {16,16,
0x00,0x00,0x00,0x00,0x00,0x00,0x00,0x00,0x00,0x00,0x40,0x02,0x40,0x02,0x70,0x0c,0x58,0x1c,0x3c,0x24,0x19,0xe4,0x16,0x98,0x11,0x70,0x08,0x70,0x08,0x00,0x0e,0x00};

const byte paul_frontw2blue[] PROGMEM = {16,16,
0x00,0x00,0x00,0x00,0x00,0x00,0x00,0x00,0x00,0x00,0x00,0x00,0x02,0x40,0x02,0x40,0x00,0x00,0x00,0x00,0x06,0x00,0x01,0x60,0x06,0x00,0x06,0x00,0x06,0x00,0x00,0x00};

const byte paul_frontw2brown[] PROGMEM = {16,16,
0x0e,0x70,0x1b,0xd8,0x16,0x68,0x19,0x98,0x20,0x04,0x16,0x68,0x00,0x00,0x00,0x00,0x00,0x00,0x00,0x00,0x00,0x00,0x00,0x00,0x00,0x00,0x00,0x00,0x00,0x00,0x00,0x00};

const byte paul_frontw2green[] PROGMEM = {16,16,
0x00,0x00,0x00,0x00,0x00,0x00,0x00,0x00,0x00,0x00,0x00,0x00,0x00,0x00,0x00,0x00,0x00,0x00,0x00,0x00,0x00,0x60,0x00,0x00,0x00,0x00,0x00,0x00,0x00,0x00,0x00,0x00};

const byte paul_frontw2grey[] PROGMEM = {16,16,
0x00,0x00,0x00,0x00,0x00,0x00,0x00,0x00,0x00,0x00,0x00,0x00,0x00,0x00,0x00,0x00,0x00,0x00,0x00,0x00,0x00,0x00,0x08,0x00,0x08,0x00,0x00,0x00,0x00,0x00,0x00,0x00};

const byte paul_frontw2pink[] PROGMEM = {16,16,
0x00,0x00,0x00,0x00,0x00,0x00,0x06,0x60,0x0f,0xf0,0x29,0x94,0x3d,0xbc,0x0d,0xb0,0x27,0xe0,0x03,0xd8,0x00,0x18,0x00,0x00,0x00,0x00,0x00,0x00,0x00,0x00,0x00,0x00};

const byte paul_frontw2red[] PROGMEM = {16,16,
0x01,0x80,0x04,0x20,0x09,0x90,0x20,0x04,0x10,0x08,0x00,0x00,0x00,0x00,0x00,0x00,0x00,0x00,0x00,0x00,0x00,0x00,0x00,0x00,0x00,0x00,0x00,0x00,0x00,0x00,0x00,0x00};

////////paul left

 const byte paul_leftblack[] PROGMEM = {16,16,
0x00,0x00,0x00,0x0,0x00,0x00,0x00,0x00,0x10,0x00,0x14,0x00,0x10,0x00,0x10,0x00,0x08,0x60,0x07,0xe0,0x00,0x20,0x03,0x20,0x04,0xe0,0x04,0x20,0x01,0xc0,0x03,0xc0};

const byte paul_leftblue[] PROGMEM = {16,16,
0x00,0x00,0x00,0x00,0x00,0x00,0x00,0x00,0x00,0x00,0x00,0x00,0x04,0x00,0x00,0x00,0x00,0x00,0x00,0x00,0x00,0x00,0x00,0x00,0x02,0x00,0x02,0x00,0x02,0x00,0x00,0x00};

const byte paul_leftbrown[] PROGMEM = {16,16,
0x0e,0xd8,0x0d,0xa8,0x1b,0x74,0x3e,0xec,0x01,0xd8,0x00,0xb4,0x00,0x88,0x00,0x00,0x00,0x00,0x00,0x00,0x00,0x00,0x00,0x00,0x00,0x00,0x00,0x00,0x00,0x00,0x00,0x00};

const byte paul_leftgreen[] PROGMEM = {16,16,
0x00,0x00,0x00,0x00,0x00,0x00,0x00,0x00,0x00,0x00,0x00,0x00,0x00,0x00,0x00,0x00,0x00,0x00,0x00,0x00,0x03,0x00,0x00,0x00,0x00,0x00,0x00,0x00,0x00,0x00,0x00,0x00};

const byte paul_leftgrey[] PROGMEM = {16,16,
0x00,0x00,0x00,0x00,0x00,0x00,0x00,0x00,0x00,0x00,0x00,0x00,0x00,0x00,0x00,0x00,0x00,0x00,0x00,0x00,0x00,0x00,0x00,0x00,0x01,0x00,0x01,0xc0,0x00,0x00,0x00,0x00};

const byte paul_leftpink[] PROGMEM = {16,16,
0x00,0x00,0x00,0x00,0x00,0x00,0x00,0x00,0x0e,0x00,0x0b,0x00,0x0b,0x60,0x0f,0xe0,0x07,0x80,0x00,0x00,0x00,0xc0,0x00,0xc0,0x00,0x00,0x00,0x00,0x00,0x00,0x00,0x00};

const byte paul_leftred[] PROGMEM = {16,16,
0x01,0x20,0x12,0x54,0x24,0x88,0x01,0x10,0x00,0x24,0x00,0x48,0x00,0x10,0x00,0x10,0x00,0x00,0x00,0x00,0x00,0x00,0x00,0x00,0x00,0x00,0x00,0x00,0x00,0x00,0x00,0x00};

///////paul_left_walk

const byte paul_leftwblack[] PROGMEM = {16,16,
0x00,0x00,0x00,0x00,0x00,0x00,0x00,0x00,0x10,0x00,0x14,0x00,0x10,0x00,0x10,0x00,0x08,0x60,0x04,0xe0,0x1f,0x98,0x24,0x94,0x13,0xe4,0x12,0x44,0x02,0x24,0x0e,0x18};

const byte paul_leftwblue[] PROGMEM = {16,16,
0x00,0x00,0x00,0x00,0x00,0x00,0x00,0x00,0x00,0x00,0x00,0x00,0x04,0x00,0x00,0x00,0x00,0x00,0x00,0x00,0x00,0x00,0x18,0x08,0x08,0x18,0x0c,0x38,0x0c,0x18,0x00,0x00};

const byte paul_leftwbrown[] PROGMEM = {16,16,
0x0e,0xe8,0x0d,0xd8,0x1b,0xb4,0x3f,0x6c,0x01,0xd8,0x00,0xb4,0x00,0x88,0x00,0x00,0x00,0x00,0x00,0x00,0x00,0x00,0x00,0x00,0x00,0x00,0x00,0x00,0x00,0x00,0x00,0x00};

const byte paul_leftwgreen[] PROGMEM = {16,16,
0x00,0x00,0x00,0x00,0x00,0x00,0x00,0x00,0x00,0x00,0x00,0x00,0x00,0x00,0x00,0x00,0x00,0x00,0x03,0x00,0x00,0x00,0x00,0x00,0x00,0x00,0x00,0x00,0x00,0x00,0x00,0x00};

const byte paul_leftwgrey[] PROGMEM = {16,16,
0x00,0x00,0x00,0x00,0x00,0x00,0x00,0x00,0x00,0x00,0x00,0x00,0x00,0x00,0x00,0x00,0x00,0x00,0x00,0x00,0x00,0x00,0x03,0x00,0x04,0x00,0x00,0x00,0x00,0x00,0x00,0x00};

const byte paul_leftwpink[] PROGMEM = {16,16,
0x00,0x00,0x00,0x00,0x00,0x00,0x00,0x00,0x0e,0x00,0x0b,0x00,0x0b,0x60,0x0f,0xe0,0x07,0x80,0x00,0x00,0x00,0x60,0x00,0x60,0x00,0x00,0x00,0x00,0x00,0x00,0x00,0x00};

const byte paul_leftwred[] PROGMEM = {16,16,
0x01,0x10,0x12,0x24,0x24,0x48,0x00,0x90,0x00,0x24,0x00,0x48,0x00,0x10,0x00,0x10,0x00,0x00,0x00,0x00,0x00,0x00,0x00,0x00,0x00,0x00,0x00,0x00,0x00,0x00,0x00,0x00};

////////paul_rear

 const byte paul_rearblack[] PROGMEM = {16,16,
0x00,0x00,0x00,0x00,0x00,0x00,0x00,0x00,0x00,0x00,0x40,0x02,0x40,0x02,0x30,0x0c,0x38,0x1c,0x49,0x92,0x5e,0x7a,0x39,0x9c,0x16,0x68,0x11,0x80,0x08,0x10,0x0e,0x70};

const byte paul_rearblue[] PROGMEM = {16,16,
0x00,0x00,0x00,0x00,0x00,0x00,0x00,0x00,0x00,0x00,0x00,0x00,0x00,0x00,0x00,0x00,0x00,0x00,0x06,0x60,0x01,0x80,0x06,0x60,0x01,0x80,0x06,0x60,0x06,0x60,0x00,0x00};

const byte paul_rearbrown[] PROGMEM = {16,16,
0x0d,0xb0,0x0b,0xd0,0x1d,0xb8,0x1a,0x58,0x37,0xec,0x0d,0xb0,0x0b,0xd0,0x02,0x40,0x00,0x00,0x00,0x00,0x00,0x00,0x00,0x00,0x00,0x00,0x00,0x00,0x00,0x00,0x00,0x00};

const byte paul_reargrey[] PROGMEM = {16,16,
0x00,0x00,0x00,0x00,0x00,0x00,0x00,0x00,0x00,0x00,0x00,0x00,0x00,0x00,0x00,0x00,0x00,0x00,0x00,0x00,0x00,0x00,0x00,0x00,0x08,0x10,0x08,0x10,0x00,0x00,0x00,0x00};

const byte paul_rearpink[] PROGMEM = {16,16,
0x00,0x00,0x00,0x00,0x00,0x00,0x00,0x00,0x00,0x00,0x20,0x04,0x30,0x0c,0x0c,0x30,0x07,0xe0,0x30,0x0c,0x20,0x04,0x00,0x00,0x00,0x00,0x00,0x00,0x00,0x00,0x00,0x00};

const byte paul_rearred[] PROGMEM = {16,16,
0x02,0x40,0x14,0x28,0x02,0x40,0x25,0xa4,0x08,0x10,0x12,0x48,0x04,0x20,0x01,0x80,0x00,0x00,0x00,0x00,0x00,0x00,0x00,0x00,0x00,0x00,0x00,0x00,0x00,0x00,0x00,0x00};

///////paul_rear_walk1

 const byte paul_rearw1black[] PROGMEM = {16,16,
0x00,0x00,0x00,0x00,0x00,0x00,0x00,0x00,0x00,0x00,0x40,0x02,0x40,0x02,0x30,0x0e,0x3c,0x1a,0x49,0x9c,0x4e,0x78,0x33,0xe8,0x0e,0x88,0x0e,0x10,0x00,0x10,0x00,0x70};

const byte paul_rearw1blue[] PROGMEM = {16,16,
0x00,0x00,0x00,0x00,0x00,0x00,0x00,0x00,0x00,0x00,0x00,0x00,0x00,0x00,0x00,0x00,0x00,0x00,0x06,0x60,0x01,0x80,0x0c,0x00,0x00,0x60,0x00,0x60,0x00,0x60,0x00,0x00};

const byte paul_rearw1brown[] PROGMEM = {16,16,
0x0d,0xb0,0x0b,0xd0,0x1d,0xb8,0x1a,0x58,0x37,0xec,0x0d,0xb0,0x0b,0xd0,0x02,0x40,0x00,0x00,0x00,0x00,0x00,0x00,0x00,0x00,0x00,0x00,0x00,0x00,0x00,0x00,0x00,0x00};

const byte paul_rearw1grey[] PROGMEM = {16,16,
0x00,0x00,0x00,0x00,0x00,0x00,0x00,0x00,0x00,0x00,0x00,0x00,0x00,0x00,0x00,0x00,0x00,0x00,0x00,0x00,0x00,0x00,0x00,0x10,0x00,0x10,0x00,0x00,0x00,0x00,0x00,0x00};

const byte paul_rearw1pink[] PROGMEM = {16,16,
0x00,0x00,0x00,0x00,0x00,0x00,0x00,0x00,0x00,0x00,0x20,0x04,0x30,0x0c,0x0c,0x30,0x03,0xe4,0x30,0x00,0x30,0x00,0x00,0x00,0x00,0x00,0x00,0x00,0x00,0x00,0x00,0x00};

const byte paul_rearw1red[] PROGMEM = {16,16,
0x02,0x40,0x14,0x28,0x02,0x40,0x25,0xa4,0x08,0x10,0x12,0x48,0x04,0x20,0x01,0x80,0x00,0x00,0x00,0x00,0x00,0x00,0x00,0x00,0x00,0x00,0x00,0x00,0x00,0x00,0x00,0x00};

///////paul_rear_walk2

const byte paul_rearw2black[] PROGMEM = {16,16,
0x00,0x00,0x00,0x00,0x00,0x00,0x00,0x00,0x00,0x00,0x40,0x02,0x40,0x02,0x70,0x0c,0x58,0x1c,0x39,0x92,0x1e,0x72,0x17,0x4c,0x11,0x70,0x08,0x70,0x08,0x00,0x0e,0x00};

const byte paul_rearw2blue[] PROGMEM = {16,16,
0x00,0x00,0x00,0x00,0x00,0x00,0x00,0x00,0x00,0x00,0x00,0x00,0x00,0x00,0x00,0x00,0x00,0x00,0x06,0x60,0x01,0x80,0x00,0x30,0x06,0x00,0x06,0x00,0x06,0x00,0x00,0x00};

const byte paul_rearw2brown[] PROGMEM = {16,16,
0x0d,0xb0,0x0b,0xd0,0x1d,0xb8,0x1a,0x58,0x37,0xec,0x0d,0xb0,0x0b,0xd0,0x02,0x40,0x00,0x00,0x00,0x00,0x00,0x00,0x00,0x00,0x00,0x00,0x00,0x00,0x00,0x00,0x00,0x00};

const byte paul_rearw2grey[] PROGMEM = {16,16,
0x00,0x00,0x00,0x00,0x00,0x00,0x00,0x00,0x00,0x00,0x00,0x00,0x00,0x00,0x00,0x00,0x00,0x00,0x00,0x00,0x00,0x00,0x08,0x00,0x08,0x00,0x00,0x00,0x00,0x00,0x00,0x00};

const byte paul_rearw2pink[] PROGMEM = {16,16,
0x00,0x00,0x00,0x00,0x00,0x00,0x00,0x00,0x00,0x00,0x20,0x04,0x30,0x0c,0x0c,0x30,0x27,0xc,0x00,0x0c,0x00,0x0c,0x00,0x00,0x00,0x00,0x00,0x00,0x00,0x00,0x00,0x00};

const byte paul_rearw2red[] PROGMEM = {16,16,
0x02,0x40,0x14,0x28,0x02,0x40,0x25,0xa4,0x08,0x10,0x12,0x48,0x04,0x20,0x01,0x80,0x00,0x00,0x00,0x00,0x00,0x00,0x00,0x00,0x00,0x00,0x00,0x00,0x00,0x00,0x00,0x00};

////////paul_right

 const byte paul_rightblack[] PROGMEM = {16,16,
0x00,0x00,0x00,0x00,0x00,0x00,0x00,0x00,0x00,0x08,0x00,0x28,0x00,0x08,0x00,0x08,0x06,0x10,0x07,0xe0,0x04,0x00,0x04,0xc0,0x07,0x20,0x04,0x20,0x03,0x80,0x03,0xc0};

const byte paul_rightblue[] PROGMEM = {16,16,
0x00,0x00,0x00,0x00,0x00,0x00,0x00,0x00,0x00,0x00,0x00,0x00,0x00,0x20,0x00,0x00,0x00,0x00,0x00,0x00,0x00,0xc0,0x00,0x00,0x00,0x40,0x00,0x40,0x00,0x40,0x00,0x00};

const byte paul_rightbrown[] PROGMEM = {16,16,
0x1b,0x70,0x15,0xb0,0x2e,0xd8,0x37,0x7c,0x1b,0x80,0x2d,0x00,0x11,0x00,0x00,0x00,0x00,0x00,0x00,0x00,0x00,0x00,0x00,0x00,0x00,0x00,0x00,0x00,0x00,0x00,0x00,0x00};

const byte paul_rightgrey[] PROGMEM = {16,16,
0x00,0x00,0x00,0x00,0x00,0x00,0x00,0x00,0x00,0x00,0x00,0x00,0x00,0x00,0x00,0x00,0x00,0x00,0x00,0x00,0x00,0x00,0x00,0x00,0x00,0x80,0x03,0x80,0x00,0x00,0x00,0x00};

const byte paul_rightpink[] PROGMEM = {16,16,
0x00,0x00,0x00,0x00,0x00,0x00,0x00,0x00,0x00,0x70,0x00,0xd0,0x06,0xd0,0x07,0xf0,0x01,0xe0,0x00,0x00,0x03,0x00,0x03,0x00,0x00,0x00,0x00,0x00,0x00,0x00,0x00,0x00};

const byte paul_rightred[] PROGMEM = {16,16,
0x04,0x80,0x2a,0x48,0x11,0x24,0x08,0x80,0x24,0x00,0x12,0x00,0x08,0x00,0x08,0x00,0x00,0x00,0x00,0x00,0x00,0x00,0x00,0x00,0x00,0x00,0x00,0x00,0x00,0x00,0x00,0x00};

////////paul_right_walk

 const byte paul_rightwblack[] PROGMEM = {16,16,
0x00,0x00,0x00,0x00,0x00,0x00,0x00,0x00,0x00,0x08,0x00,0x28,0x00,0x08,0x00,0x08,0x06,0x10,0x07,0x20,0x19,0xf8,0x29,0x24,0x27,0xc8,0x22,0x48,0x24,0x40,0x18,0x70};

const byte paul_rightwblue[] PROGMEM = {16,16,
0x00,0x00,0x00,0x00,0x00,0x00,0x00,0x00,0x00,0x00,0x00,0x00,0x00,0x20,0x00,0x00,0x00,0x00,0x00,0xc0,0x00,0x00,0x10,0x18,0x18,0x10,0x1c,0x30,0x18,0x30,0x00,0x00};

const byte paul_rightwbrown[] PROGMEM = {16,16,
0x17,0x70,0x1b,0xb0,0x2d,0xd8,0x36,0xfc,0x1b,0x80,0x2d,0x00,0x11,0x00,0x00,0x00,0x00,0x00,0x00,0x00,0x00,0x00,0x00,0x00,0x00,0x00,0x00,0x00,0x00,0x00,0x00,0x00};

const byte paul_rightwgrey[] PROGMEM = {16,16,
0x00,0x00,0x00,0x00,0x00,0x00,0x00,0x00,0x00,0x00,0x00,0x00,0x00,0x00,0x00,0x00,0x00,0x00,0x00,0x00,0x00,0x00,0x00,0xc0,0x00,0x20,0x00,0x00,0x00,0x00,0x00,0x00};

const byte paul_rightwpink[] PROGMEM = {16,16,
0x00,0x00,0x00,0x00,0x00,0x00,0x00,0x00,0x00,0x70,0x00,0xd0,0x06,0xd0,0x07,0xf0,0x01,0xe0,0x00,0x00,0x06,0x00,0x06,0x00,0x00,0x00,0x00,0x00,0x00,0x00,0x00,0x00};

const byte paul_rightwred[] PROGMEM = {16,16,
0x08,0x80,0x24,0x48,0x12,0x24,0x09,0x00,0x24,0x00,0x12,0x00,0x08,0x00,0x08,0x00,0x00,0x00,0x00,0x00,0x00,0x00,0x00,0x00,0x00,0x00,0x00,0x00,0x00,0x00,0x00,0x00};

/////////////////////////////////////////////////////////////////////////////////////////////////////////////////////////////////////////////////////////////////
/////////////////////////////////////////////////////////////////////////////////////////////////////////////////////////////////////////////////////////////////

const byte rock_black[] PROGMEM = {16,16,
B00010101,B10110100,B00001101,B10001110,B00001101,B10001101,B00001101,B10000101,B00001001,B10000101,B00001001,B10000001,B00001001,B10000110,B00001011,B00000010,B00001001,B10000001,B00011001,B10000001,B00111011,B10000011,B00100011,B11000010,B01000001,B10000010,B01000001,B10000010,B00000001,B11000111,B10000001,B10100110};

const byte rock_beige[] PROGMEM = {16,16,
B00001000,B00001000,B00000010,B00000001,B00000010,B00000000,B10000010,B00000000,B10000100,B00000000,B00000100,B00000000,B00000100,B00011001,B00000100,B00100001,B00000100,B00100000,B00000100,B00010000,B10000100,B00100000,B10011100,B00000001,B00100000,B01000001,B00100000,B01000001,B01000000,B00000000,B01010010,B0011001};

const byte rock_brown[] PROGMEM = {16,16,
B11100010,B01000011,B11110000,B01110000,B11110000,B01110010,B01110000,B01111010,B01110010,B01111010,B11110010,B01111110,B11110010,B01100000,B11110010,B01011100,B11110010,B01011110,B11100010,B01011110,B01000000,B01011100,B01000000,B00111100,B10011110,B00111100,B10011110,B00111100,B10111110,B00111000,B00101100,B01000000};

///////////////////////////////////////////////////////////////////////////////////////////////////////////////////////////////////////////////////////////////////
///////////////////////////////////////////////////////////////////////////////////////////////////////////////////////////////////////////////////////////////////

const byte sand_brown[] PROGMEM = {16,16,
B00010001,B00010001,B00000000,B00000000,B10001000,B10001000,B00000000,B00000000,B00010001,B00010001,B00000000,B00000000,B10001000,B10001000,B00000000,B00000000,B00010001,B00010001,B00000000,B00000000,B10001000,B10001000,B00000000,B00000000,B00010001,B00010001,B00000000,B00000000,B10001000,B10001000,B00000000,B00000000};

const byte sand_beige[] PROGMEM = {16,16,
B11101110,B11101110,B11111111,B11111111,B01110111,B01110111,B11111111,B11111111,B11101110,B11101110,B11111111,B11111111,B01110111,B01110111,B11111111,B11111111,B11101110,B11101110,B11111111,B11111111,B01110111,B01110111,B11111111,B11111111,B11101110,B11101110,B11111111,B11111111,B01110111,B01110111,B11111111,B11111111};

///////////////////////////////////////////////////////////////////////////////////////////////////////////////////////////////////////////////////////////////////
///////////////////////////////////////////////////////////////////////////////////////////////////////////////////////////////////////////////////////////////////

const byte blank_tile1[] PROGMEM = {16,16,
B00000000,B00000000,B00000000,B00000000,B00000000,B00000000,B00000000,B00000000,B00000000,B00000000,B00000000,B00000000,B00000000,B00000000,B00000000,B00000000,B00000000,B00000000,B00000000,B00000000,B00000000,B00000000,B00000000,B00000000,B00000000,B00000000,B00000000,B00000000,B00000000,B00000000,B00000000,B00000000};

const byte blank_tile2[] PROGMEM = {16,16,
B00000000,B00000000,B00000000,B00000000,B00000000,B00000000,B00000000,B00000000,B00000000,B00000000,B00000000,B00000000,B00000000,B00000000,B00000000,B00000000,B00000000,B00000000,B00000000,B00000000,B00000000,B00000000,B00000000,B00000000,B00000000,B00000000,B00000000,B00000000,B00000000,B00000000,B00000000,B00000000};

const byte blank_tile3[] PROGMEM = {16,16,
B00000000,B00000000,B00000000,B00000000,B00000000,B00000000,B00000000,B00000000,B00000000,B00000000,B00000000,B00000000,B00000000,B00000000,B00000000,B00000000,B00000000,B00000000,B00000000,B00000000,B00000000,B00000000,B00000000,B00000000,B00000000,B00000000,B00000000,B00000000,B00000000,B00000000,B00000000,B00000000};

const byte *spritesheet1[] = {blank_tile1,rock_black,};

const byte *spritesheet2[] = {blank_tile2, rock_brown, sand_brown,};

const byte *spritesheet3[] = {blank_tile3, rock_beige, sand_beige,};
///////////////////////////////////////////////////////////////////////////////////////////////////////////////////////////////////////////////////////////////////
///////////////////////////////////////////////////////////////////////////////////////////////////////////////////////////////////////////////////////////////////


///black
const byte tilemap1[] PROGMEM = {20,15,
16,16,
0,0,0,0,0,0,0,0,0,0,0,0,0,0,0,0,0,0,0,0,
0,0,0,0,1,1,1,1,1,0,0,0,0,0,1,1,1,1,0,0,
0,0,0,0,0,0,0,0,0,0,0,0,0,0,0,0,0,0,0,0,
0,0,0,0,1,1,1,1,0,0,0,0,0,0,1,1,1,1,0,0,
0,0,0,0,0,0,0,0,0,0,0,0,0,0,0,0,0,0,0,0,
0,0,0,0,1,1,1,1,0,0,0,0,0,0,1,1,1,1,0,0,
0,0,0,0,0,0,0,0,0,0,0,0,0,0,0,0,0,0,0,0,
0,0,0,0,1,1,1,1,0,0,0,0,0,0,1,1,1,1,0,0,
1,1,1,1,1,1,1,0,0,0,0,0,0,0,0,1,1,1,1,1,
1,1,1,1,1,1,1,0,0,0,0,0,0,0,0,1,1,1,1,1,
0,0,0,0,1,1,1,1,0,0,0,0,0,0,1,1,1,1,0,0,
0,0,0,0,1,1,1,1,0,0,0,0,0,0,1,1,1,1,0,0,
1,1,1,1,1,1,1,1,0,0,0,0,0,0,1,1,1,1,1,1,
1,1,1,1,1,1,1,1,0,0,0,0,0,1,1,1,1,1,1,1,
0,0,0,0,0,0,0,0,0,0,0,0,0,0,0,0,0,0,0,0,};

///brown
const byte tilemap2[] PROGMEM = {20,15,
16,16,
2,2,2,2,2,2,2,2,2,2,2,2,2,2,2,2,2,2,2,2,
2,2,2,2,1,1,1,1,2,2,2,2,2,2,1,1,1,1,2,2,
2,2,2,2,2,2,2,2,2,2,2,2,2,2,2,2,2,2,2,2,
2,2,2,2,1,1,1,1,2,2,2,2,2,2,1,1,1,1,2,2,
2,2,2,2,2,2,2,2,2,2,2,2,2,2,2,2,2,2,2,2,
2,2,2,2,1,1,1,1,2,2,2,2,2,2,1,1,1,1,2,2,
2,2,2,2,2,2,2,2,2,2,2,2,2,2,2,2,2,2,2,2,
2,2,2,2,1,1,1,1,2,2,2,2,2,2,1,1,1,1,2,2,
1,1,1,1,1,1,1,2,2,2,2,2,2,2,2,1,1,1,1,1,
1,1,1,1,1,1,1,2,2,2,2,2,2,2,2,1,1,1,1,1,
2,2,2,2,1,1,1,1,2,2,2,2,2,2,1,1,1,1,2,2,
2,2,2,2,1,1,1,1,2,2,2,2,2,2,1,1,1,1,2,2,
1,1,1,1,1,1,1,1,2,2,2,2,2,2,1,1,1,1,1,1,
1,1,1,1,1,1,1,1,2,2,2,2,2,1,1,1,1,1,1,1,
2,2,2,2,2,2,2,2,2,2,2,2,2,2,2,2,2,2,2,2,};

///beige

const byte tilemap3[] PROGMEM = {20,15,
16,16,
2,2,2,2,2,2,2,2,2,2,2,2,2,2,2,2,2,2,2,2,
2,2,2,2,1,1,1,1,2,2,2,2,2,2,1,1,1,1,2,2,
2,2,2,2,2,2,2,2,2,2,2,2,2,2,2,2,2,2,2,2,
2,2,2,2,1,1,1,1,2,2,2,2,2,2,1,1,1,1,2,2,
2,2,2,2,2,2,2,2,2,2,2,2,2,2,2,2,2,2,2,2,
2,2,2,2,1,1,1,1,2,2,2,2,2,2,1,1,1,1,2,2,
2,2,2,2,2,2,2,2,2,2,2,2,2,2,2,2,2,2,2,2,
2,2,2,2,1,1,1,1,2,2,2,2,2,2,1,1,1,1,2,2,
1,1,1,1,1,1,1,2,2,2,2,2,2,2,2,1,1,1,1,1,
1,1,1,1,1,1,1,2,2,2,2,2,2,2,2,1,1,1,1,1,
2,2,2,2,1,1,1,1,2,2,2,2,2,2,1,1,1,1,2,2,
2,2,2,2,1,1,1,1,2,2,2,2,2,2,1,1,1,1,2,2,
1,1,1,1,1,1,1,1,2,2,2,2,2,2,1,1,1,1,1,1,
1,1,1,1,1,1,1,1,2,2,2,2,2,1,1,1,1,1,1,1,
2,2,2,2,2,2,2,2,2,2,2,2,2,2,2,2,2,2,2,2,};

//////dpad + select buttons
const int buttonUp = 33; //up button
Bounce ButtonUp = Bounce(buttonUp, 10);  // 10 ms debounce
const int buttonDown = 38; //down_button
Bounce ButtonDown = Bounce(buttonDown, 10);  // 10 ms debounce
const int buttonLeft = 35; //left button
Bounce ButtonLeft = Bounce(buttonLeft, 10);  // 10 ms debounce
const int buttonRight = 17; //right button
Bounce ButtonRight = Bounce(buttonRight, 10);  // 10 ms debounce
const int buttonS = 21; //select button
Bounce ButtonS = Bounce(buttonS, 10);  // 10 ms debounce

//////action + start buttons
const int buttonX = 32; // X button up
Bounce ButtonX = Bounce(buttonX, 10);  // 10 ms debounce
const int buttonY = 26; // Y button left
Bounce ButtonY = Bounce(buttonY, 10);  // 10 ms debounce
const int buttonA = 21; // A button right
Bounce ButtonA = Bounce(buttonA, 10);  // 10 ms debounce
const int buttonB = 28; // B buttun down
Bounce ButtonB = Bounce(buttonB, 10);  // 10 ms debounce
const int buttonT = 4; // Start button
Bounce ButtonT = Bounce(buttonT, 10);  // 10 ms debounce

void setup() {
   Serial.begin(38400);
   long unsigned debug_start = millis();
   while (!Serial && ((millis() - debug_start) <= 5000));
   Serial.println("serial ok, testing lib...");
  tft.begin();
  tft.setFrameRate(62);
  tft.persistence = false;
   pinMode(buttonUp, INPUT_PULLUP);
   pinMode(buttonDown, INPUT_PULLUP);
   pinMode(buttonLeft, INPUT_PULLUP);
   pinMode(buttonRight, INPUT_PULLUP);
   pinMode(buttonS, INPUT_PULLUP);
   pinMode(buttonX, INPUT_PULLUP);
   pinMode(buttonY, INPUT_PULLUP);
   pinMode(buttonA, INPUT_PULLUP);
   pinMode(buttonB, INPUT_PULLUP);
   pinMode(buttonT, INPUT_PULLUP);

//Serial.print("Initializing SD card...");
//  if (!SD.begin(SD_CS)) {
//    Serial.println("failed!");
//  }

//  Serial.println("OK!")

//the following it's mainly for Teensy
  //it will help you to understand if you have choosed the
  //wrong combination of pins!
  errorCode = tft.getErrorCode();
  if (errorCode != 0) {
     Serial.print("Init error! ");
     if (bitRead(errorCode, 0)) Serial.print("MOSI or SCLK pin mismach!\n");
     if (bitRead(errorCode, 1)) Serial.print("CS or DC pin mismach!\n");
  }
  else {
     Serial.println("Inited");
  }
}

///////////////////////////////////////////////////////////////
///////////////////////////////////////////////////////////////

void loop(void) {
//updates the GameRIot (the display, the sound, the buttons, everyyhing)
  //returns true when it's time to render a new frame (20 times/second)
   if(tft.updateAll()){

   if (ButtonUp.update());
   if (ButtonDown.update());
   if (ButtonLeft.update());
   if (ButtonRight.update());

   ButtonUp.rebounce(10);
   ButtonDown.rebounce(10);
   ButtonLeft.rebounce(10);
   ButtonRight.rebounce(10);

    if (ButtonUp.fallingEdge()){
       tft.drawBitmap1(player_x, player_y,paul_rearblack,16,16,BLACK);
         tft.drawBitmap1(player_x, player_y,paul_rearblue,16,16,BLUE);
          tft.drawBitmap1(player_x, player_y,paul_rearbrown,16,16,BROWN);
          tft.drawBitmap1(player_x, player_y,paul_reargrey,16,16,GREY);
           tft.drawBitmap1(player_x, player_y,paul_rearpink,16,16,PINK);
            tft.drawBitmap1(player_x, player_y,paul_rearred,16,16,RED);


           player_direction = 1;
             player_y = player_y - 1;}


       if (ButtonDown.fallingEdge()){
        tft.drawBitmap1(player_x, player_y,paul_frontblack,16,16,BLACK);
         tft.drawBitmap1(player_x, player_y,paul_frontblue,16,16,BLUE);
          tft.drawBitmap1(player_x, player_y,paul_frontbrown,16,16,BROWN);
          tft.drawBitmap1(player_x, player_y,paul_frontgrey,16,16,GREY);
          tft.drawBitmap1(player_x, player_y,paul_frontgreen,16,16,GREEN);
           tft.drawBitmap1(player_x, player_y,paul_frontpink,16,16,PINK);
            tft.drawBitmap1(player_x, player_y,paul_frontred,16,16,RED);


           player_direction = 2;
            player_y = player_y + 1;}

       if (ButtonLeft.fallingEdge()){
        tft.drawBitmap1(player_x, player_y,paul_leftblack,16,16,BLACK);
         tft.drawBitmap1(player_x, player_y,paul_leftblue,16,16,BLUE);
          tft.drawBitmap1(player_x, player_y,paul_leftbrown,16,16,BROWN);
          tft.drawBitmap1(player_x, player_y,paul_leftgreen,16,16,GREEN);
          tft.drawBitmap1(player_x, player_y,paul_leftgrey,16,16,GREY);
           tft.drawBitmap1(player_x, player_y,paul_leftpink,16,16,PINK);
            tft.drawBitmap1(player_x, player_y,paul_leftred,16,16,RED);


           player_direction = 3;
             player_x = player_x - 1;}


       if (ButtonRight.fallingEdge()){
        tft.drawBitmap1(player_x, player_y,paul_rightblack,16,16,BLACK);
         tft.drawBitmap1(player_x, player_y,paul_rightblue,16,16,BLUE);
          tft.drawBitmap1(player_x, player_y,paul_rightbrown,16,16,BROWN);
          tft.drawBitmap1(player_x, player_y,paul_rightbrown,16,16,GREY);
           tft.drawBitmap1(player_x, player_y,paul_rightpink,16,16,PINK);
            tft.drawBitmap1(player_x, player_y,paul_rightred,16,16,RED);


            player_direction = 4;
            player_x = player_x + 1;}


       /////////////////PLAYER DIRECTION/////////////////

        if (player_direction == 1){
          tft.drawBitmap1(player_x, player_y,paul_rearblack,16,16,BLACK);
         tft.drawBitmap1(player_x, player_y,paul_rearblue,16,16,BLUE);
          tft.drawBitmap1(player_x, player_y,paul_rearbrown,16,16,BROWN);
          tft.drawBitmap1(player_x, player_y,paul_reargrey,16,16,GREY);
           tft.drawBitmap1(player_x, player_y,paul_rearpink,16,16,PINK);
            tft.drawBitmap1(player_x, player_y,paul_rearred,16,16,RED);

       }

      else if (player_direction == 2){
         tft.drawBitmap1(player_x, player_y,paul_frontblack,16,16,BLACK);
         tft.drawBitmap1(player_x, player_y,paul_frontblue,16,16,BLUE);
          tft.drawBitmap1(player_x, player_y,paul_frontbrown,16,16,BROWN);
          tft.drawBitmap1(player_x, player_y,paul_frontgrey,16,16,GREY);
          tft.drawBitmap1(player_x, player_y,paul_frontgreen,16,16,GREEN);
           tft.drawBitmap1(player_x, player_y,paul_frontpink,16,16,PINK);
            tft.drawBitmap1(player_x, player_y,paul_frontred,16,16,RED);

              }


       else if (player_direction == 3){
         tft.drawBitmap1(player_x, player_y,paul_leftblack,16,16,BLACK);
         tft.drawBitmap1(player_x, player_y,paul_leftblue,16,16,BLUE);
          tft.drawBitmap1(player_x, player_y,paul_leftbrown,16,16,BROWN);
          tft.drawBitmap1(player_x, player_y,paul_leftgreen,16,16,GREEN);
          tft.drawBitmap1(player_x, player_y,paul_leftgrey,16,16,GREY);
           tft.drawBitmap1(player_x, player_y,paul_leftpink,16,16,PINK);
            tft.drawBitmap1(player_x, player_y,paul_leftred,16,16,RED);

            }


        else if (player_direction == 4){
          tft.drawBitmap1(player_x, player_y,paul_rightblack,16,16,BLACK);
         tft.drawBitmap1(player_x, player_y,paul_rightblue,16,16,BLUE);
          tft.drawBitmap1(player_x, player_y,paul_rightbrown,16,16,BROWN);
          tft.drawBitmap1(player_x, player_y,paul_rightbrown,16,16,GREY);
          tft.drawBitmap1(player_x, player_y,paul_rightpink,16,16,PINK);
            tft.drawBitmap1(player_x, player_y,paul_rightred,16,16,RED);

               }

          }
     }
Still playing with controls. Ok if you use the sketch above the player moves very easily. But when you add the tilemap he moves very slow. I had to make the the +1 in the movement 5 and it's still a lil annoyingly slow.
You can tweak the milliseconds on the buttons to save power, only updating some fast.
I haven't fixed the tilemap yet I just wanted to see how the player reacts with one behind it.
https://youtu.be/bRqo2YXLKzo
Now on github........
https://github.com/Duhjoker/GameRIot_ESP
https://github.com/Duhjoker/GameRIot-master_gaming
Duhjoker Thu Jul 27, 2017 4:28 am
Ok so I updated the player/camera controls and now I have them dialed it just right. Take a look at this......
ok so the first set is for displaying the character on screen, that should be self explanatory. Next we have camera placement on screen where you want to start. Next is camera speed. Displaying bitmaps on top of bitmaps and then commanding them to move with each other causes friction which makes the movements like ssssssllllllloooooooooooooooowwwwwwww dial up. so now we can speed up the the rate at which new pixels show up on screen. The buffer helps but this Makes things a lot smoother.
the camera offset boundaries will need to change to the specifics of your tilemap. For the ili9341 tft subtract the commented numbers by the total pixel width 0f the map. The player offset boundaries should not change. Are dialed in just right for the screen,
ok now heres the magic
by clamping the camera like so all we have to do is change the pixel coordinates and making dialing in your world map much easier.
- Code: Select all
 int player_x = 160;     //player position on screen x
 int player_y = 176;     //player position on screen y
 int player_direction = 2;
 int x=-0,y=0;
///////////////////////////////////////////////////////////////////////////////
///////////////////////////////////////////////////////////////////////////////
// Camera offset
int cameraX = -840;  /////starting position X 0f camera on tilemap
int cameraY = -1504;  /////starting position Y of camera on tilemap

// Camera speed in pixels per update
int cameraXSpeed = 3;
int cameraYSpeed = 3;

// Camera offset boundaries
const int cameraXMin = -1376;   /////// -320 0f total pixels left
const int cameraXMax = 0;
const int cameraYMin = -1440;   /////// -256 0f total pixels down
const int cameraYMax = 0;

// Player offset boundaries
const int playerXMin = 80;
const int playerXMax = 240;
const int playerYMin = 80;
const int playerYMax = 160;
ok so the first set is for displaying the character on screen, that should be self explanatory. Next we have camera placement on screen where you want to start. Next is camera speed. Displaying bitmaps on top of bitmaps and then commanding them to move with each other causes friction which makes the movements like ssssssllllllloooooooooooooooowwwwwwww dial up. so now we can speed up the the rate at which new pixels show up on screen. The buffer helps but this Makes things a lot smoother.
the camera offset boundaries will need to change to the specifics of your tilemap. For the ili9341 tft subtract the commented numbers by the total pixel width 0f the map. The player offset boundaries should not change. Are dialed in just right for the screen,
ok now heres the magic
- Code: Select all
///////////////////////////////////////////////////////////////////////////////
////////////////////////////////camera controls////////////////////////////////
///////////////////////////////////////////////////////////////////////////////
// Clamp cameraX
if(cameraX < cameraXMin)
{
  cameraX = cameraXMin;
}
else if(cameraX > cameraXMax)
{
   cameraX = cameraXMax;
}

// Clamp cameraY
if(cameraY < cameraYMin)
{
  cameraY = cameraYMin;
}
else if(cameraY > cameraYMax)
{
   cameraY = cameraYMax;
}

// Check if player is beyond X boundary
if(player_x < playerXMin)
{
  cameraX += cameraXSpeed;
  if(cameraX > cameraXMin && cameraX < cameraXMax)
  {
    player_x = playerXMin;
  }
}
else if(player_x > playerXMax)
{
  cameraX -= cameraXSpeed;
  if(cameraX > cameraXMin && cameraX < cameraXMax)
  {
    player_x = playerXMax;
  }
}

// Check if player is beyond Y boundary
if(player_y < playerYMin)
{
  cameraY += cameraYSpeed;
  if(cameraY > cameraYMin && cameraY < cameraYMax)
  {
    player_y = playerYMin;
  }
}
else if(player_y > playerYMax)
{
  cameraY -= cameraYSpeed;
  if(cameraY > cameraYMin && cameraY < cameraYMax)
  {
    player_y = playerYMax;
  }
}
by clamping the camera like so all we have to do is change the pixel coordinates and making dialing in your world map much easier.