
Archive of the Gamebuino Classic forum (2014-2018), rebuilt from the pages kept by the Wayback Machine: only part of the topics and pages were captured. Read-only. Removal on request: hi@gamebuino.com.
DHT22 (Temperature / Humidity)
ripper121 Tue May 27, 2014 8:49 am
The DHT22 is a Humidity and Temperature Sensor.
Connecting:
DHT(GND) = I2C(0V/GND)
DHT(VCC) = I2C(3.3V)
DHT(Sensor) = I2C(DA)
Code to read the Senosr:
DHTx Library : Download
![2014-05-27_1048[1].png](files/292-file.png)
- 2014-05-27_1048[1].png (16.27 KiB) Viewed 8354 times
Connecting:
DHT(GND) = I2C(0V/GND)
DHT(VCC) = I2C(3.3V)
DHT(Sensor) = I2C(DA)
Code to read the Senosr:
- Code: Select all
// Example testing sketch for various DHT humidity/temperature sensors
// Written by ladyada, public domain
//imports the SPI library (needed to communicate with Gamebuino's screen)
#include <SPI.h>
//imports the Gamebuino library
#include <Gamebuino.h>
//creates a Gamebuino object named gb
Gamebuino gb;

#include "DHT.h"

#define DHTPIN A4    // what pin we're connected to

// Uncomment whatever type you're using!
//#define DHTTYPE DHT11   // DHT 11
#define DHTTYPE DHT22   // DHT 22  (AM2302)
//#define DHTTYPE DHT21   // DHT 21 (AM2301)

// Connect pin 1 (on the left) of the sensor to +5V
// Connect pin 2 of the sensor to whatever your DHTPIN is
// Connect pin 4 (on the right) of the sensor to GROUND
// Connect a 10K resistor from pin 2 (data) to pin 1 (power) of the sensor

DHT dht(DHTPIN, DHTTYPE);

void setup() {
  // initialize the Gamebuino object
  gb.begin(F("DHT22"));
  dht.begin();
}

void loop() {

  if (gb.update()) {
    // Reading temperature or humidity takes about 250 milliseconds!
    // Sensor readings may also be up to 2 seconds 'old' (its a very slow sensor)
    float h = dht.readHumidity();
    float t = dht.readTemperature();

    // check if returns are valid, if they are NaN (not a number) then something went wrong!
    if (isnan(t) || isnan(h)) {
      gb.display.println(F("No Sensor!"));
    } else {
      gb.display.println(F("Humidity: "));
      gb.display.print(h);
      gb.display.println(F(" %"));
      gb.display.println(F("Temperature: "));
      gb.display.print(t);
      gb.display.println(F(" C"));
    }
  }
}
DHTx Library : Download
adekto Tue May 27, 2014 11:53 am
looks cool, more of a application
not sure if u can make anything game like out of it?
also if its not to much would u add a fahrenheit conversion for the amerikans :lol:
not sure if u can make anything game like out of it?
also if its not to much would u add a fahrenheit conversion for the amerikans :lol:
ripper121 Tue May 27, 2014 12:15 pm
I have tested the tinyFAT but i dont get it work for me fine.
When i convert the float to char* and write it to file i get cryptic symbols and from my float value only the first 2 digits
When i convert the float to char* and write it to file i get cryptic symbols and from my float value only the first 2 digits
Awot Wed May 03, 2017 6:53 pm
Hello,
i have just bought a DHT22 in order to test it with the Gamebuino,
as i am not very good at electronics, i made this diagram to help me understant how to connect the Gamebuino's I2C port to the DHT22 :
i hope it s right
i have just bought a DHT22 in order to test it with the Gamebuino,
as i am not very good at electronics, i made this diagram to help me understant how to connect the Gamebuino's I2C port to the DHT22 :
- Code: Select all
Connecting:
DHT(GND) = I2C(0V/GND)
DHT(VCC) = I2C(3.3V)
DHT(Sensor) = I2C(DA)
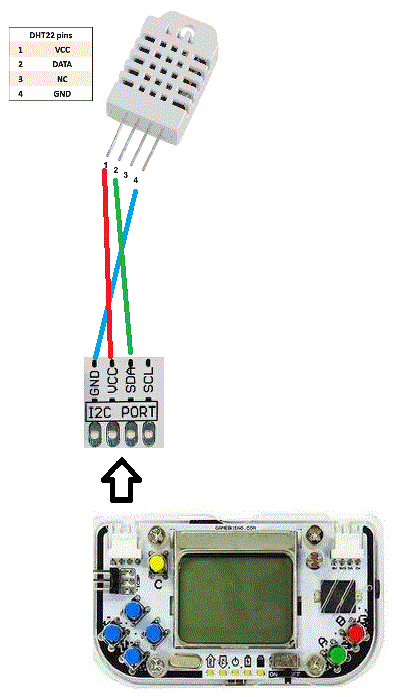
- ICSPportGamebuino.gif (43.47 KiB) Viewed 7197 times
i hope it s right
Awot Thu May 11, 2017 6:01 pm
Hello
i saw this :
// Connect pin 1 (on the left) of the sensor to +5V
// Connect pin 2 of the sensor to whatever your DHTPIN is
// Connect pin 4 (on the right) of the sensor to GROUND
// Connect a 10K resistor from pin 2 (data) to pin 1 (power) of the sensor
so i updated my diagram with the 10K resistor
i saw this :
// Connect pin 1 (on the left) of the sensor to +5V
// Connect pin 2 of the sensor to whatever your DHTPIN is
// Connect pin 4 (on the right) of the sensor to GROUND
// Connect a 10K resistor from pin 2 (data) to pin 1 (power) of the sensor
so i updated my diagram with the 10K resistor
Myndale Thu May 11, 2017 10:04 pm
Awot wrote:so i updated my diagram with the 10K resistor
I don't believe this is necessary. The code you posted is from the adafruit DHT library which doesn't specifically target Gamebuino hardware. As you can see from the Gamebuino hardware specs Rodot added 4K7 pull-up resistors to the I2C pins, so you don't need to add them yourself (the exact value of the resistor doesn't matter in this instance).
Also the updated diagram you posted shows the resister across VCC and GND, so it won't do anything anyway other than to heat it up a little. ;)
Awot Fri May 12, 2017 9:28 am
ok thanks for your help Myndale,
i ll correct the diagram, and i ll try this with my Gamebuino
i ll correct the diagram, and i ll try this with my Gamebuino
Awot Sat May 13, 2017 8:44 am
Nice ! this is working
i don't have exactly the same sensor, mine has 3 PINs not 4, but its working fine
i don't have exactly the same sensor, mine has 3 PINs not 4, but its working fine
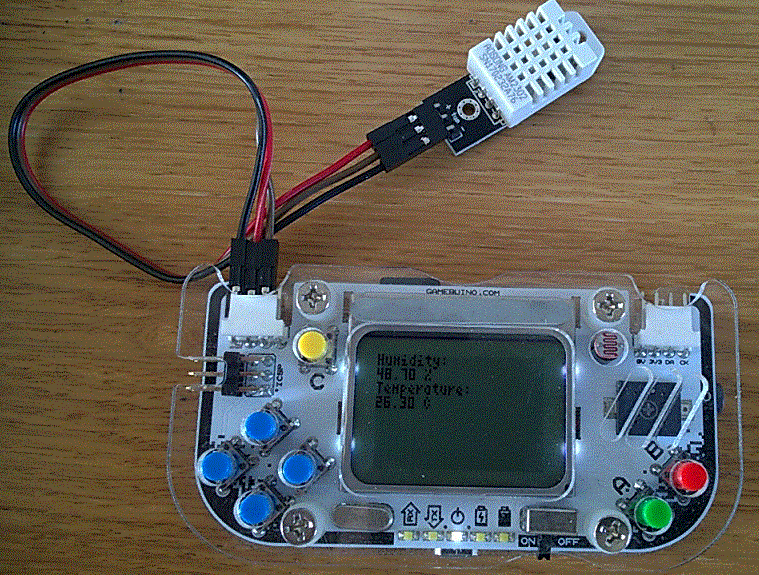
- HUMI.gif (217.51 KiB) Viewed 7182 times